In this step by step and easy to follow tutorial, I will show you how to add Favicon to WordPress.
Before that, though, let me ask you…
…Do you want your website to stand out from the crowd and root stronger into your customers’ minds?
If so, please keep reading. The article below should help you.
If you want to know how you can make $1,200+ a month online from the comfort of your home – well this is your chance
It’s FREE to get started, too (no credit card required). You’ll like that part…
1. How is Favicon Useful?
There is a simple trick that helps your website to stand out from the crowd. The secret lies in a tiny icon on a tab of your browser. This icon is called Favicon, from the words “Favourites Icon.”
See! It’s here:
![]()
This small design element has a significant role in your online campaign. You may wonder, though, how this tiny piece of graphics could be beneficial. And then, how to add it to your website?
1. Stand Out From the Crowd
If you have not added your Favicon yet, a default image looks like a little blank page. Something like that:
Not impressive, do you agree?
Free web software like WordPress, Wix, etc., have their default Favicons, but they too are not attractive. Or, they are promoting their brand, not yours.
In fact, tons of small businesses and blogs don’t have Favicons installed. Therefore, it’s your chance to stand out by adding your Favicon to your website. This way, your site looks more polished and has more credibility in your customers’ eyes.
2. Your Site is More Easily Recognized
By adding your Favicon, you save your clients time. How?
People are visual by nature, which is why we recognize images and colors much faster than information hidden in the text. Look at the picture below. That is part of the Google Chrome bookmark menu.
Can you recognize some of the Favicons?
![]()
But look at the image below. All the favicons are just blank pages and don’t tell you anything.
![]()
You want your brand to root into people’s minds, so use your Favicon and help them identify your website.
3. Sign of Trust and Professionalism
Building trust with your customers is one of the primary functions of your visual branding. Without Favicon added, you send your customers a message that you are not quite professional. You tell them that you are still a newbie. This small design element with only 16×16 pixels in size helps you look professional, even if you just started. It will also confirm your returning customers that they returned to the right place.
Imagine for looking for legit work-from-home opportunities and finding THIS when you go inside… WOW
It won’t cost you a bean to find out if it can help you.
2. How Big Brands Design Their Favicons?
The common practice is to use a logo as a Favicon. However, there are two main problems:
- A Favicon is tiny – only 16×16 pixels in size.
- A shape of a Favicon is square.
These might be problems because many logos are too complex to display at such small sizes, and many of them fit better into rectangles than squares. So how do companies solve these problems?
Some examples:
1. Facebook uses its logo:
2. Paypal uses its logo too:
![]() 3. CNN fits its logo into the Favicon, See! The text is tiny:
3. CNN fits its logo into the Favicon, See! The text is tiny:
4. Twitter is using its logo:
3. Make Your Favicon
Use your favorite image editor (or Gimp, MS Paint, Paint.Net, etc.) to design your Favicon. Choose a canvas with 500×500 pixels.
1. Choose a canvas with 500×500 pixels.
2. Design Favicon. Please notice that the Favicon will be tiny, only 16×16 pixels, so
1 Give Your Favicon a Transparent Background
If you want to give your Favicon a transparent background, use your image editing software to make the background transparent first. Chessboard-like grey-white background means it is transparent:
1. Create a new file, say 500 x 500 pixels. This new image file has only one layer – the background. And the background is white.
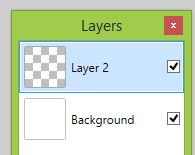
2. The easiest way to make the background transparent is this. You add another layer and then delete the original background layer. So from the main menu, choose Layers → Add New Layer. Now you have two layers. Do you see, the second layer is transparent? It’s like a transparent film.
3. Now delete the original background layer. For this, select the Background layer, then click Layers → Delete Layer.
4. After that, you have only one layer, and this is transparent. Now design your favicon.
5. If you are happy with it, then save the file as .gif!
DO NOT save it as a .jpg file!
Note! If you save it as a .jpg file, the result will still be a white background.
2. Turn Your Image File Into a Favicon
After you are finished with your Favicon design, go to http://www.favicon.co.uk/. Here you generate a Favicon.Ico file from your image. On their homepage, you should see something like this:
Click the “Choose File” button and choose your image. At Favicon Size, it is up to you to decide how big you want it. You can leave it 32×32 pixels. Hit “Generate Favicon.” Your Favicon is generated, and you are asked to download a Favicon.ico file to your computer. Click “Download Your Favicon Here.”
Note! You may also want to try this Online Favicon Maker to create your Favicon.
If you don’t have a WordPress site, skip section #4, and jump right to section #5.
4. How to Add Favicon to WordPress
Log in to your WordPress website and go to “Plugins” → “Add New.” Type in “Favicon” and click “Search Plugins.”
A list of available plugins is provided. I prefer “All in One Favicon.” It supports .ico file formats but also .gif and .png. I recommend using the favicon.ico file. Some applications may not read favicon png and gif versions. So .ico is the safest way to go.
Click “Install Now,” and after installation, click “Activate Plugin.” That will take you to the Plugins page. Find your newly installed Favicon plugin and click “Settings.” You see two sections here: “Frontend Settings” and “Backend Settings” that allow .ico, .gif, and .png file formats. If you followed the instructions here, you have the favicon.ico file. Upload your newly created favicon.ico file into respective places of “Frontend Settings”:
and “Backend Settings”:
After that, hit the “Save Changes” button.
Congratulation! Your Favicon is created and uploaded. You can go to your website and check it out.
5. Add the Favicon to Your Website
If you don’t have a WordPress website, do the following:
1. Use your favorite FTP program to log into your site.
2. Go to /httpdocs/ and find the file named favicon.ico. Delete it.
3. Upload your newly created favicon.ico file in that folder.
4. Go to your website and refresh it in the browser window. The Favicon shows up now.
What if I could show you a real system you can use to put $1,200+ per month into your account, working from the comfort of your home…
…Would you be interested?
If you’re interested don’t hang about. Just click here right now
How About You?
If you have any questions or comments about the topic that you want to share, please leave them in the comment form below.


 ARE YOU looking for ways to create a legit passive income online?
Egon – You have written an incredible article of “how-to” … it was so simple to make the favicon for my site! Never knew how to do it until you showed me here at your blog. :-) Truly appreciate it and appreciate you sharing your knowledge. God Bless! :-)
Thank you Cathy for the feedback. I am happy to hear that my tutorial was helpful. God bless you too and have a blessed Christmas season. :)
Thanks for this tutorial, Egon. Very useful and easy to follow. With the help of this post I’ve just added a favicon to my site. Thanks, Peter
Thank you for your feedback. Glad to hear, the tutorial was helpful. I checked out and you have your favicon. Great. My recommendation is that make a transparent background, otherwise it is like white rectangle. Then I noticed that I had not really explained how to make a transparent background. I already improved my tutorial and added the section to explain it better. So you see, you helped me to improve my content too :) Thank you very much.
Thanks for pointing that out Egon. I have now changed to a transparent background and it does look better. Thanks again, Peter
Thank you for the feedback, Peter. I am glad that this tutorial helped you :)
Egon,
This is another awesome article. Thanks for sharing!!! It really was an excellent tutorial. Keep it up my friend.
Thank you very much, for the feedback and for the encouraging words. Glad if you found it helpful. :)