How to insert a table in WordPress?
Here’s an easy, step-by-step tutorial in which I show you how to insert a table in WordPress. Just follow the instructions, and you can easily accomplish it.
If you knew how to make $1200 a month online, from the comfort of your home, would you do the work?
…Well THIS is your chance
It’s FREE to get started, too (no credit card required). You’ll like that part…
1. Download and Install a Plugin
Log into your WordPress Dashboard and click on Plugins → Add New. Then, under Search, type in Tablepress, and click on Search Plugins. Under Tablepress, you want to install and activate it.
Once you do that, a Tablepress icon appears on the WordPress toolbar.
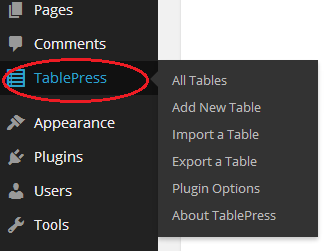
Also, you find the TablePress button and its sub-menu in the sidebar.
2. Create a Table using TablePress
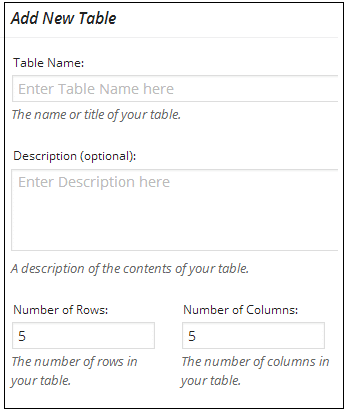
now that the plugin is installed and activated, you can start creating a table. Just hover over Tablepress in the sidebar and click on Add New Table. A window opens where you can give your table a name, write a short description, and choose how many rows and columns you need. All these things you can change later too.
After that, hit Add table. Your table is ready, and you can start filling it with data. Also, you are provided with the shortcode that you can use in your blog post (I come to this later):
3. Populate the Table With Data
After your table is created, the next Tablepress page is divided into five sections:
- Table Information – here, you can edit your settings like table name and description
- Table Content – here, you insert and edit data
- Table Manipulation – here, you add links, also add and delete rows and columns
- Table Options – here, you deal with head and foot rows, etc.
- Features of DataTables JavaScript Library – here, you find another set of features that you may leave untouched because the way it’s set up is the way you want it.
Now I show you how to enter data into the newly created table.
3.1. Table Content
That is the section you are interested in because you want to enter your data after creating a table. Your empty table in edit mode looks like this:
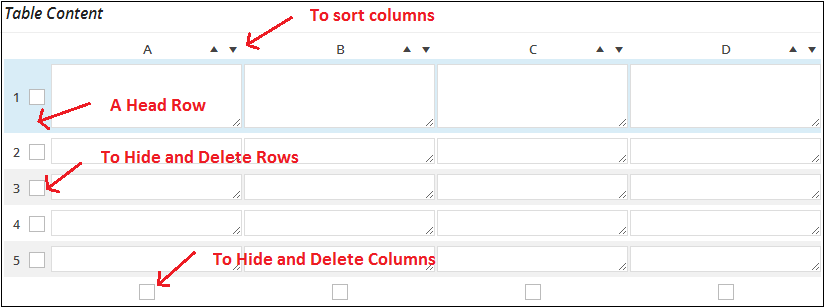
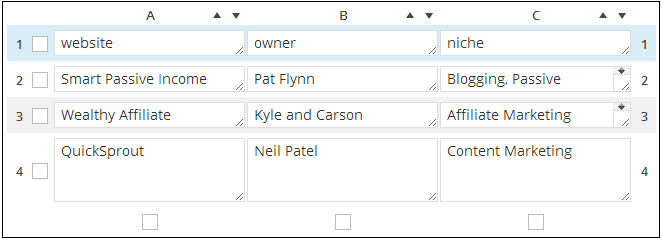
The first row, which is light blue, is the table header row. It is because this feature is checked in the Table Options section. So the first row is for titles of respective columns. All other rows are for data. Just click the first cell and type your data.
For example, let’s say I want to make a table where I collect some data about websites that I am interested in. This is what I do:
Use these checkboxes to delete rows and columns.
After you have finished, scroll up and hit Save Changes and then Preview.
This is the preview of the table that will later show up in a blog post:
You need to copy and paste that shortcode into your editor. We will do it soon.
3.2. Adding Links
But before that, I want to show you how to add links to the table. I can tell you, the way to do it is a little bit tricky, and I struggled to figure out how to do it. So I better give you step-by-step instructions.
Let’s say I want to add links to each of those websites in my table. How do I do it?
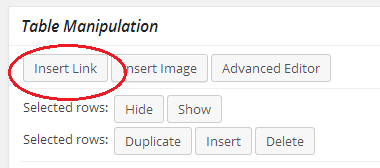
First, I hit an Insert Link button in the Table Manipulation section. Yes, FIRST, you have to hit this button!
THEN you select the piece of text that you want to be a link:
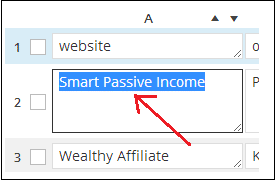
Insert/Edit Link window opens where you can enter the URL. After that, click on the Add link, and that’s it. After saving changes and hitting Preview, you can see a nice link showing up in your table cell.
4. Insert a Table into Your Blog Post
After you have finished editing your table, you want to enter it into content, right? You probably have already understood that the table is a separate piece of data and IS NOT inside any blog post or article. For this, you need to copy and paste a shortcode that I mentioned earlier in your post.
a. Open your blog post and find the place where you want to enter the newly created table.
b. Hit the Insert a Table from TablePress button
b. Select the table and click on the Insert Shortcode button. That’s it. The shortcode of the table is automatically inserted. The code is short, but once you publish your post, an excellent, cool-looking, and sortable table shows up in the right place.
Even better. TablePress makes it easy to use the same already created table in other posts and web pages too. Just hit the Tablepress button in the WordPress editor toolbar and insert a shortcode of the table.
Conclusion
TablePress Plugin has other features that I don’t cover here. I just wanted to keep the post short, simple, and easy to follow. I tried to cover the basics of inserting a cool-looking table in WordPress web pages.
Imagine for looking for legit work-from-home opportunities and finding THIS when you go inside… WOW
Why not make it the very next thing you do?
What About You?
What other ways do you use to add a table in WordPress? Please drop me a comment below:







 ARE YOU looking for ways to create a legit passive income online?
Hi,
You post addressing the same information what I am looking for. I want to insert table in my two post so that its look good in professional. Thanks for sharing this. :)
Thank you Hiten, if you found it useful. And thank you for the feedback :)