THIS short, easy, and step-by-step tutorial will teach you how to transfer files with FileZilla, the free FTP client.
More precisely, I am going to show you how to install FileZilla into your computer, how to connect with FileZilla, and how to transfer files with FileZilla. Also, you will learn how to download and how to upload files with FileZilla.
If you knew how to make $1200 a month online, from the comfort of your home, would you do the work?
It’s FREE to get started, too (no credit card required). You’ll like that part…
It is true that most of the things (or problems) you can solve through your site’s WordPress dashboard. However, sometimes you just need to have access to the actual files of your website. These are the times when you need to use some FTP (File Transfer Protocol) client to create a connection to the server.
That’s where FileZilla comes into play.
It creates a connection between your computer and the remote server where the actual files of your website locate. It is a little bit similar to the contemporary cloud system, where files are sitting somewhere on a server and you have no idea where on Earth they physically locate.
The physical location is not important, though. All you need is to have access to these files (wherever they are). And that’s just exactly what FileZilla does. Once you give FileZilla your access details, it will connect you to the right server, and you will see your files.
Keep reading and I show you exactly how to do it.
Free Filezilla Download
On the FileZilla website they give you two options: You can download free FTP Client, or you can download FileZilla FTP Server (free also):

As you see, the Filezilla Client is the way to go if transferring files (uploading or downloading them) is your intention. Filezilla Server is a tool for making files available for others (uploading for others to download).
Download FileZilla free FTP solution here (client).
Download FileZilla FTP Server here.
As you also see, the FileZilla Client is available for all platforms (32 bit Windows, 64 bit Windows, Mac Os X, and Linux). FileZilla Server is only for 32 and 64 bit Windows.
In this tutorial, though, my aim is to show how to transfer files with Filezilla. Therefore, I am not going to touch the Filezilla Server here.
Well, now, what you want to do is hit “Download FileZilla Client” and download it to your computer. After that, install the FileZilla free FTP solution.
Next stop:
How to Connect With FileZilla
After you have installed FileZilla, run it. The FileZilla (version 3.20.1) dashboard looks like this:
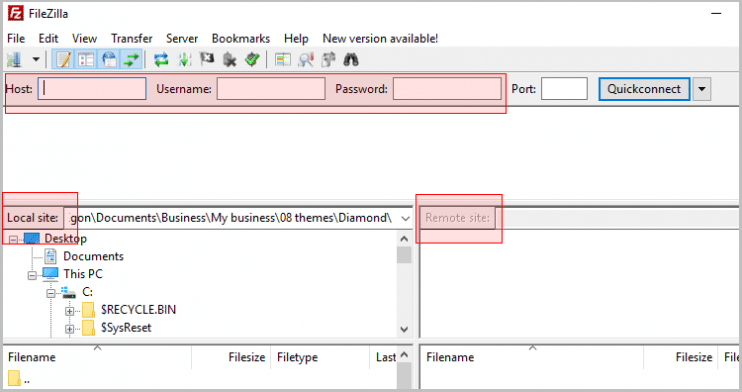
On top of the FileZilla dashboard and right under the menu bars you see four empty text boxes. These text boxes are here so that you can give FileZilla access details to your site.
In the middle of the dashboard, you see that the are is divided into two parts:
- Left side – Local site – This is the file system of your local computer.
- Right side – Remote site – It’s empty at the moment. However, after FileZilla connects you to the server, the remote files (the actual files) of your website will show up here.
Therefore, you need that connection first. So let me come back to the access details text boxes. Here’s how you fill them:
- Host – type the domain name of your website (without http://). Example: egonsarvreviews.com
- Username – type your username
- Password – type your password
- Port – leave it as it is.
Hey! What username? What password?
That might be quite a puzzle, right? Your Gmail username and password don’t apparently work. So what should you write here?
This username and password are provided by your website’s hosting service. In my case, I use Wealthy Affiliate SiteDomains. If your site happens to use Wealthy Affiliate hosting, you will find your access details under the
“Site Manager.” That’s where my access details are:
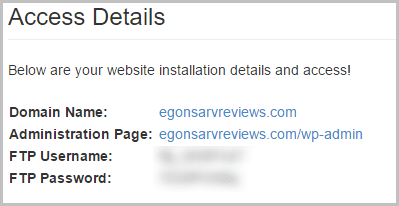
Therefore, log in to your hosting service’s dashboard and get FTP access details to your website.
After filling the text boxes host, username, and password hit Quickconnect beside them.
If you did everything right, the FileZilla connects you to the server. Now you should see the actual files of your website in your FTP client (FileZilla) window. Again:
- The window on the left shows you the files of your computer.
- The window on the right lists the files of your website (remote files on the server).
Do you see the files on the right?
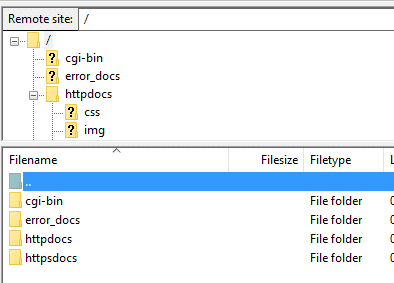
If so, great. You are connected.
If not, then probably something went wrong. For some reason, the FTP client failed to connect you. In this case, try again.
How to Transfer Files With Filezilla
Now that you have created connections with the server you can start transferring files with FileZilla. Fortunately, that’s really easy to do. You can download with FileZilla. And you can upload with FileZilla.
How to download With FileZilla
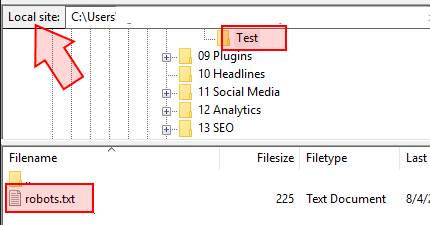
First, on the left-hand side (local site) navigate to the folder where a download is saved.
Second, on the right-hand side (remote site) navigate to the file you want to download.
Example:
Let’s say I want to download Robots.txt file from the server. As you see, the file locates in the httpdocs folder.
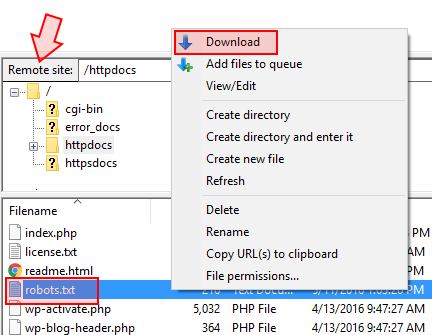
Using the right mouse button hit Download and FileZilla downloads the robots.txt into your local hard drive:
How to Upload With FTP Client
Uploading from the local computer to the server is pretty much opposite to downloading files. On the left-hand side (local site) navigate to the folder where the file (or files) locate.
On the right-hand side (remote server) navigate to a folder where an upload will be saved.
Select the file that you want to upload. Then, using the right mouse button hit “Upload:”
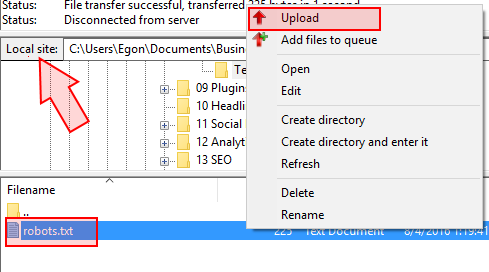
If FileZilla does not encounter any errors, you file (or files) will be uploaded to the server.
After you have transferred all the files disconnect using “Disconnect” button on the FileZilla menu at the top.
Imagine for looking for legit work-from-home opportunities and finding THIS when you go inside… WOW
Yes, the raw, sizzling beauty of passive income stream online… Look closer now. Because sometimes ‘later’ becomes ‘never .‘
Share Your Ideas:
Did this step-by-step tutorial help you learn how to transfer files with Filezilla? What other FTP solutions you like to use? Please let me know by leaving a comment below. Thank you :)
Related Articles you might like:


 ARE YOU looking for ways to create a legit passive income online?