Because you are here, you are probably trying to figure out how to add an image border in WordPress. Am I right?
OK, first, let me explain how you can benefit if you add borders to images in your articles.
In my opinion, adequately designed image borders give a website a much cleaner look.
If you knew how to make $1200 a month online, from the comfort of your home, would you do the work?
…Well THIS is your chance
It’s FREE to get started, too (no credit card required). You’ll like that part…
This is especially true if you use a lot of screenshots in your articles. Then these cutouts look much cleaner with borders around them.
See yourself:
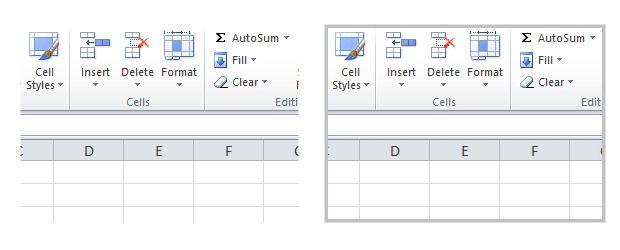
That’s why I prefer using borders. And that’s how you could benefit from using them.
Therefore, what I propose to do here is to provide a few simple methods to add borders to images.
In this post, you will learn:
- What plugins you can use to add borders to images
- How to add borders to all images
- How to add borders to selected images
- How to remove borders from selected images
[Sidebar: If you want to learn about my #1 work-at-home opportunity, check out THIS! You’re going to like this (Yes, I am using it since 2013).]
First stop:
Your Problem Is This:
Life in times of WordPress 3.8 and below was easy indeed. Image border options were deep in the core of WordPress. All you needed to do was clicking on the image, hit edit, and choose what kind of border you wanted to add.
However, with WordPress 3.9, everything changed. Suddenly, the border options had been removed these popular options from the core of the WordPress. This turned many WordPress users red-hot mad, of course.
However, there is sound logic behind that move.
Namely, these image options added a piece of code into the inline (I’ll write more about it later).
Undoubtedly, more code makes the whole thing slower and more vulnerable to mistakes. That’s the reason people in WordPress finally decided to oust the already coded border options and opt to use CSS classes instead (more about this later).
Which brings us to the question – How to add borders to images? That’s what I want to show you now. Keep reading.
How to Add Image Border in WordPress
In case you want to use a plugin, then I found two plugins that add a border to the images:
- Advanced Image Styles Wordpress plugin
- WP Image Borders WordPress plugin
1. Advanced Image Styles
The maker of the plugin says that it requires WordPress 3.9 or higher and is compatible up to WordPress 4.4.
However, with WordPress 4.6, I could not make it work. Maybe there are some incompatibility problems with my other plugins; I don’t know. You may want to try; perhaps it works for you.
2. WP Image Borders
This plugin Requires WP 3.0.1 or higher and is compatible up to WP 4.2.9.
However, it works fine with WP 4.6 and WP 4.7. So I am delighted with it. Yes, I am using it.
How to Add Borders to All Images
A. Do it Manually
It might look ridiculous now, but yes – I did it manually. You know why? Because I did not know any better way of adding them. And somehow, I did not have an idea to search for more efficient options. Therefore, that’s what I did.
Before uploading images, I edited them in Paint.net (Photoshop alternative) and added borders manually.
Boring? Yes.
Time-wasting? Yes.
I still did it to get the results I wanted. Now, fortunately, I have found better ways, and I am going to show you the exact steps of doing it. So keep reading.
Therefore, I don’t recommend adding borders manually.
B. How to Add Image Border Using a Plugin
Step 1
Go to the WP Image Borders download page and hit “download.”
Step 2
Log in to your WordPress dashboard. Then, on the left-hand side menu, click on Plugins → Add new → Upload plugin → Choose file. In your computer, navigate to the folder where you downloaded the plugin, then hit “Open.”
Step 3
Click on the “Install now” button:

Step 4
After the installation process of the plugin is finished, click on the “Activate plugin” link. Now the plugin is up and running.
Step 5
On the left-handed menu, head over to Settings → WP Image Borders.
Step 6
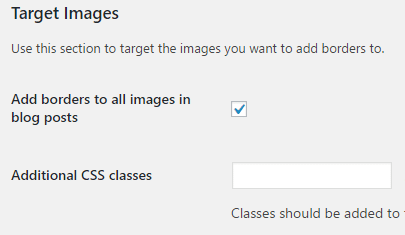
Check “Add borders to all images in blog posts.”
Step 7
Let’s say I want to add a green, solid, and 3 pixels wide border to all images. That’s how I do it:
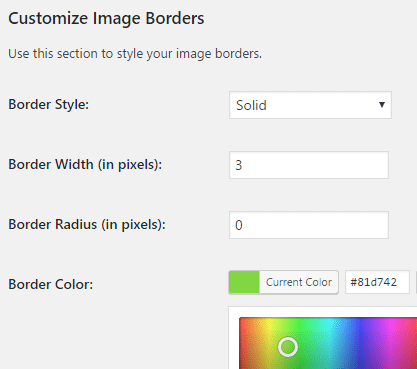
That’s all you need to change. Then scroll down and click on “Save Changes. ”
See the results:

Feel free to change the border style, width, and color as you like best.
C. How to Add Border CSS
Step 1
Log in to your WordPress dashboard. On the left-hand side menu, please navigate to Appearance → Editor. It will open your theme’s Stylesheet (style.css).
Onward.
Your Stylesheet probably differs from mine you should be able to find something like this:

Step 2
You don’t need to understand the code. Just copy and paste the piece of code into custom.css, then modify it as follows:

As you see, I added the same border style to three different places. This is you can align image left, right, and center:
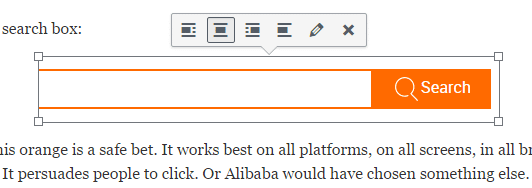
Apparently, in each case, I want that there is a border around the picture.
Now, coming to that piece of code,
- 3px – width of the border;
- solid – border type;
- #C0C0C0 – the hex code of the light gray shade.
Again, feel free to change the border width, type, and color to your own needs.
How to Add Border to Selected Images
Maybe you say, “But I don’t want to add borders to all images in my posts and pages. I want to add borders only to some selected images. What then?”
There are different options for doing this:
A. Adding Image Border Manually
You can use the same manual technique that I described above. Only this time, you have much less work to do.
B. Adding Image Border Using In-line Styles in WordPress
Evidently, this method is manual as well. Only this time, you don’t edit the image but add CSS style in the HTML code.
Step 1
Upload and insert your image into a WordPress post.
Step 2
Switch to the WordPress text editor:
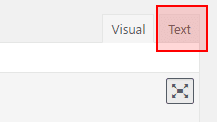
Now you can see the HTML code of your image. It is something like this (starting with the “img”):

Now it is easy to add CSS style to that picture:

Rinse and Repeat. Add code to every image you want to have a border.
However, according to today’s web standards, this is not the proper way to do this. Technically it is correct, of course, and you can do it if you want. But please remember, lots of inline code slow your site down and can cause problems too (a small mistype here or there, and it won’t work).
Therefore, a much better way to do it is to create a CSS class and then pull it from your global Stylesheet. Which brings us the next topic:
C. Adding CSS Class to an Image in WordPress
Step 1
Install the WP Image Borders plugin, as described at the beginning of this post.
Step 2
On the left-hand WordPress menu, head over to Settings – WP Image Borders.
Uncheck “Add borders to all images in posts.”
To create a new CSS class, give it a name (Note! It must start with a period “.”) For example: “.green-border” .
See! There is a period before the name:
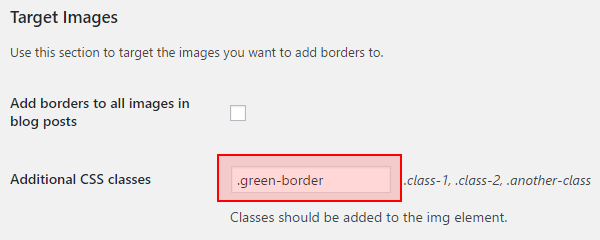
Step 3
Customize your border by following the instructions given above (“How to Add Image Border Using a Plugin”). Then scroll down and hit “Save Changes.” This way, you have created a new CSS class for image borders.
To apply that newly created border class to selected images, please do the following:
Step 4
In the WordPress visual editor, click on the image that you want to have a border. After selecting it, click on the Edit button in the toolbar:

Step 5
In the “Image Details” click on “Advanced Options,” then type in the name you gave your newly created CSS class.
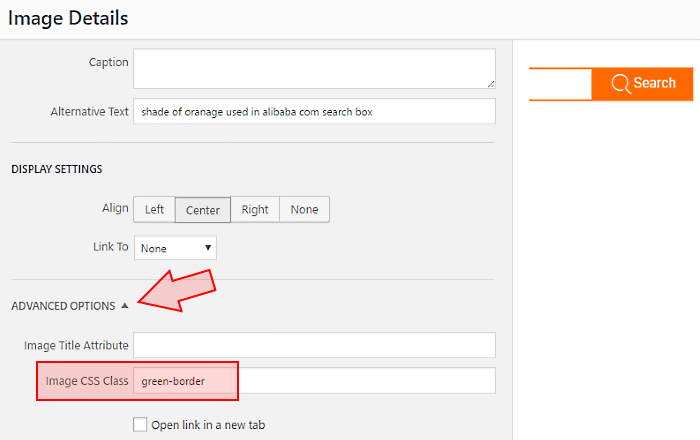
Step 6
Click on the “Update” button. That’s it.
Rinse and Repeat.
Finally, don’t forget to update your post or page. Or the changes won’t show up on your site.
How to Remove Border From Selected Images
This is a polar opposite situation to the previous one. Instead of adding borders to only selected images, what you want is that most of the pictures HAVE borders, and only some of them don’t.
That’s what happened to me. I applied one of the techniques described above to add borders to all images. I was happy.
Until I designed a cute button and inserted it in my post. That’s what happened:

See! It’s ugly. Therefore, how to remove borders from selected images?
I did this way:
Step 1
I added borders to all images by using Custom CSS, as described above.
Step 2
To remove borders from the selected images, I first installed the WP Image Borders plugin. Second, I created a new CSS class for those images that I wanted to see without borders (this method too, is described above):
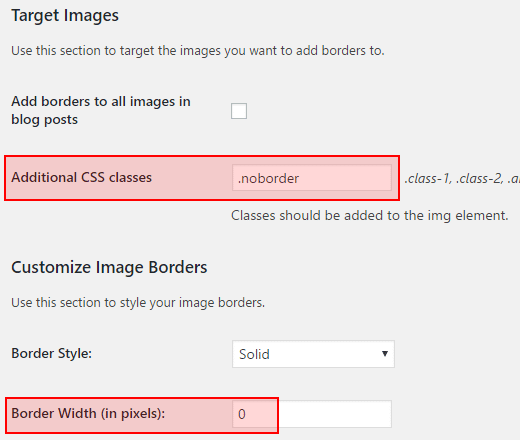
As you can see, I gave it the name “.noborder” (with the period “.” in front of it). Also, I did set the ‘Border Width’ = 0 (zero). After that, the border-color did not matter anymore.
Step 3
I head over to my post, click on the image that I want without a border. Then click on “Edit” button and tie the image with the newly created CSS class “noborder” (this time without a period, though):
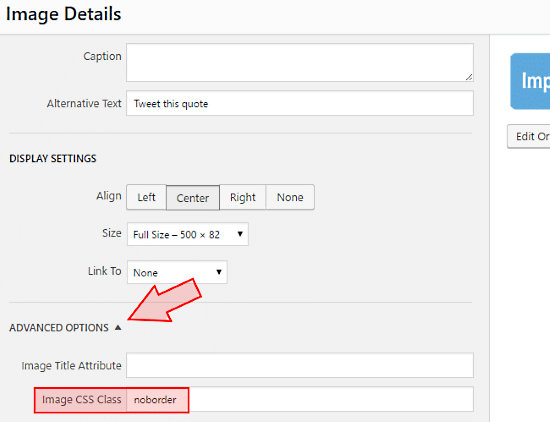
Step 4
Update the Image Details. Update the post and voila:
Rinse and Repeat.
That’s it. The only images without borders are the ones with the image CSS class “noborder.”

What About You?
Was this article helpful? Did you learn how to add an image border in WordPress? And do you know any other (more efficient) method to add or remove borders? Please let me know by leaving a comment into the comment box below. Thank you!
Related articles:


 ARE YOU looking for ways to create a legit passive income online?