Do you struggle with the problem of how to change some default settings of your Paragraph Style and Headings on WordPress?
You have your favorite free WordPress theme installed, and everything looks almost incredible. But only almost. You are not perfectly happy with the way it looks. The body text of your blog is a bit too small (or too big). The font color is too dark or too light. The spacing between lines is too narrow or too broad.
So you would like to change the headings’ size and color, but don’t know how to do it.
If this is your problem, then I have good news for you.
I have been in that place. I installed my free WordPress theme, but I still wanted to customize it here and there.
So in this How-To Tutorial, I will show you how to change paragraph style and headings. Or in more detail:
All these changes are relatively easy to accomplish if you know how to do them.
If you want to know how you can make $1,200+ a month online from the comfort of your home – well this is your chance
It’s FREE to get started, too (no credit card required). You’ll like that part…
1. Why to Change Default Settings?
You can change all these settings manually, too, for each blog post and each Heading separately. But it is time-consuming and frustrating.
Also, your website loses its harmony. It is not nice if you have different heading styles on different pages.
If you are not happy with your default settings, then better change them in one place, and you have fixed settings through all your website. If you still want to change them again, you can do it one time for all the content.
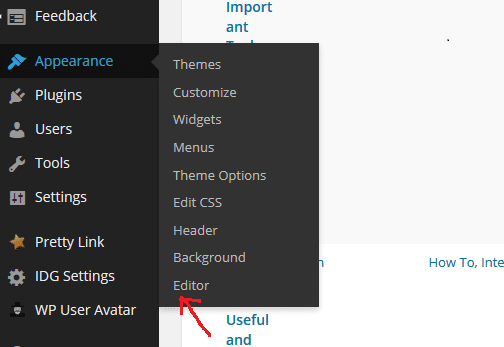
Open and Back-Up your Style.css file. First, you need to backup your Style.css file. It is an important file, and if something goes wrong with it, you may have fatal errors with your website. To open your Style.css file, log into WordPress and open Appearance → Editor:
That is the Style.css file that you see here. Before I help you do the modifications, I help you back it up. 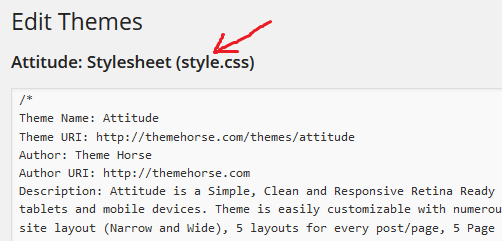
To back up the Style.css file:
1. Click somewhere in that text, and using Ctrl-A, select all the text.
2. Using Ctrl-C or your mouse, copy the selected text to a clipboard.
3. Open some simple text editor like Notepad, and using Ctrl-V or your mouse, paste it into Notepad.
4. Save the file something like style_css_file.txt
Now you have a backup of your Style.css, and you can safely start to make changes. If something goes wrong, you can always reset to defaults.
Here’s something you can do, at home and at your own pace, to make $1200+ a month online.
Finding out more costs nothing. And you’re not committing to anything else.
2. Change the Default Font Size of a Paragraph Style
Let’s say you don’t feel comfortable with the default color of your Paragraph Style. So let’s change it. 1. Open your Style.css file and find the place with ‘body.’ It should be quite in the beginning and look something like this: 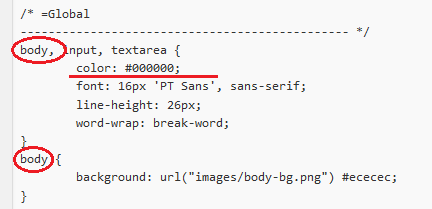 Here you see the line: color: #000000; – (the color code in your file might be something else, it depends on the theme that you use). This line determines the color of the body text (or Paragraph style) of your WHOLE website. The hexadecimal code with the # sign tells you that the current default color is black. You may wonder how you are supposed to know that it is black! And if you want to change it, how do you see the code of the color.
Don’t worry; it is straightforward.
Just open HTML color codes in a new browser window, and you will get the picture like this:
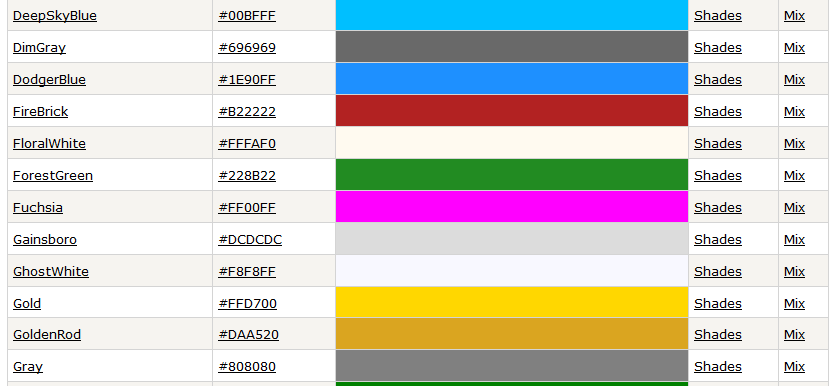 In the first row, you see the color names. In the second row, you see the respective HTML hex codes. In the third row, you see the colors. The good thing is that you can use both – the color names OR their hex codes in your Style.css file.
Example:
Let’s say your current color of the body text is black, and you want to change it to gray. Then both ways are correct:
1. You can type: Color: Grey (without # sign);
2. or you can type: color: #808080 (with a # sign).
So let’s do it (I chose to use hexacode, but you can use ‘Grey’ if you want):
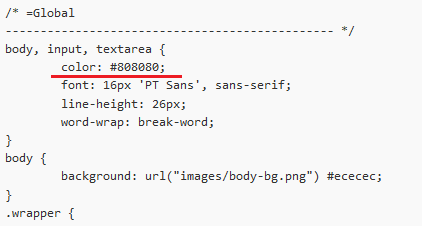 After changing the color code, move your cursor out of the Style.css text window and scroll down until you see the blue “Update File” button. Click it.
 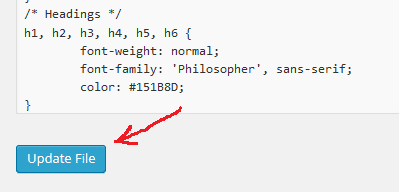 Your Style.css file is now updated. Open your website in the new browser window and refresh it. The body text through all your Website is gray now.
  This way, you can change your Body Text (or Paragraph Style) into whatever color you like. Just take the color name or its hexacode and change it in the Style.css file. Simple, isn’t it? Yes :)
Note! If you should do something wrong or want to return to your original settings but don’t remember them anymore, open your Style_css_file.txt and copy-paste from there into Style.css.
3. Change the Default Font Size of a Paragraph Style
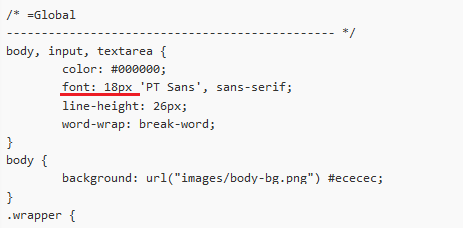
Now let’s change the default font size of the Body Text. It is as simple as the previous task. Open the same place of the Style.css:
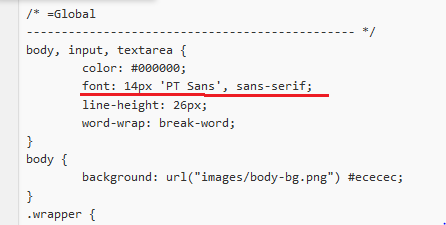 Here you see the line: font: 14px ‘PT Sans,’ sans-serif; (Again, the parameters of your Style.css file may be different. It depends on the theme you have. chosen.) Parameter 14px tells you that the default font size is 14 pixels:
 Let’s say it is a little bit too small, and we want to make it bigger. Let’s type 18px:
After updating Style.css and refreshing the website, you see the result:
4. Change the Default Line Height of a Paragraph Style
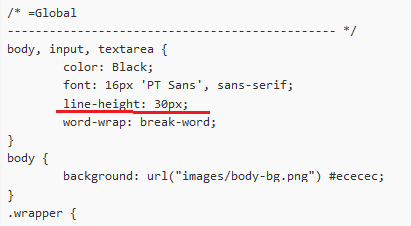
Precisely the same way you can change the spacing between lines. Just find the same place in the Style.css file, and you find the line: line-height: 26px; This line determines the default spacing between the lines. Let’s say we want to make it smaller. We change it into 22px: 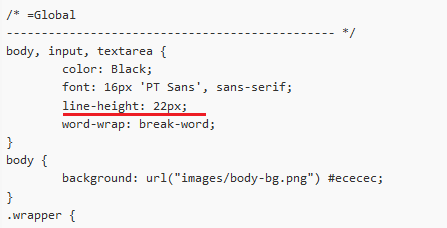
After you have updated the Style.css file and refreshed your website, you will notice that the spacing between the lines is smaller:
If you don’t like it and feel you should give more air between the lines, change the parameter:
Update the Style.css file and refresh your website. You see, the spacing between the lines are wider now:
5. Change Color, Size, Font Style, and Line Height of Headings
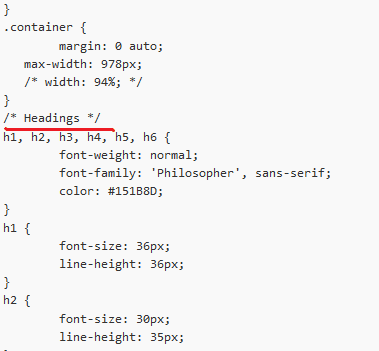
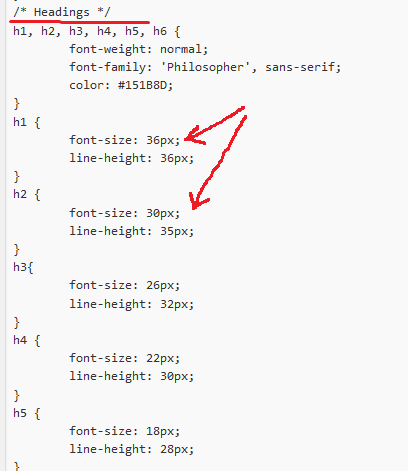
Next, I show you how to change the heading of your blog. There are six default headings used in HTML, and they are named Heading 1 (H1), Heading 2 (H2),…, Heading 6 (H6). Headings are useful as they split your text into smaller sections and make it way more scannable. Open your Style.css file as before and find the place with the Headings section. It locates somewhere at the beginning of the file and should be something like that:
The first section allows you to change a font-weight (normal, italic, bold), font-family, and color. You have to remember that these three parameters change all six headings – from Heading 1 to Heading 6.
In fact, it is good, as it gives all your headlines in the same style. The only difference is font size and line-height. To change the color of your Headings, find the line color: #151B8D in the first part of the Heading section and change its color code. The next six sections allow you to modify the font-size and line-height but this time for each Heading separately.
Font-size under H1 changes the font size of the Heading 1. Font-size under H2 changes the font size of the Heading 2, and so on. Just modify the pixel size and update the Style.css file, and all your headings have different settings.
6. Conclusion
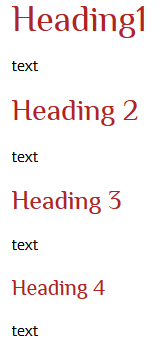
To give all headings the H1 to H6 proper sizes (if you are not happy with your default settings), make a temporary blog post (which you delete later). There you type all these headings with just some text under them. This gives you a good picture of how they look like on your web pages: 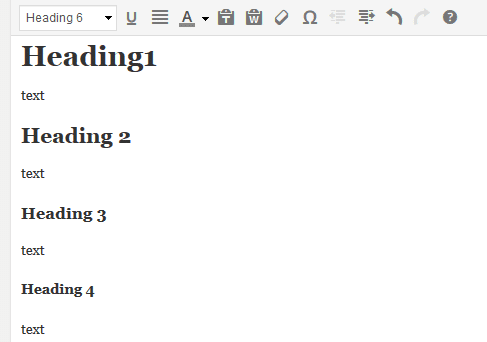
After doing it, hit “Save Draft” on the right side of the window and then hit “Preview.”
This way, you see the color, the size, the spacing, etc., for each Heading. As you see, all the headings have the same style and color; only the size and spacing differ.
 Now go back to your Style.css file and change the parameters until you are happy with all your headings.
However, please don’t make the headings too similar in size, or it will be challenging to recognize later whether it is Heading two or Heading 3… Or whether it is Heading three or Heading 4.
In the example below, I changed the color of the headings:
Imagine for looking for legit work-from-home opportunities and finding THIS when you go inside… WOW
Why not make it the very next thing you do?
What About You?
Do you have questions or comments about the topic? Please drop a comment below, and I am happy to get back to you.








 ARE YOU looking for ways to create a legit passive income online?