How to create a contact form for WordPress? In this quick and easy tutorial, I show you step-by-step how to create and set up both – your Contact form and Contact page.
No, I don’t mean a complicated Contact Information Page like some large corporations like Forbes (see here) or Entrepreneur (see here) have.
If you knew how to make $1200 a month online, from the comfort of your home, would you do the work?
…Well THIS is your chance
It’s FREE to get started, too (no credit card required). You’ll like that part…
A straightforward one. Such as Jeff Bullas uses on his blog (see here).
And hey! Here is a super-duper cool contact page, check this. (Don’t try to copy it, though.)
Back to this tutorial:
Also, I will show you how to protect yourself from spam and abuse by adding ReCaptcha to your contact form (if you should need it).
So no more messing around. Let’s dig right into the details.
Probably the Best Contact Form Plugin for WordPress
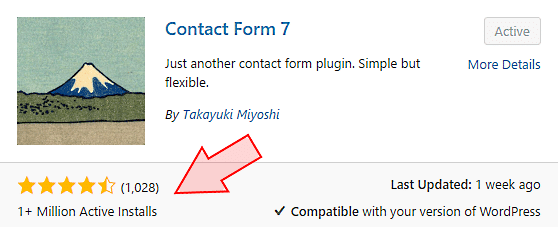
There are quite many contact-form WordPress plugins available. However, I recommend using the Contact Form 7 Wordpress plugin. This one is by far the most popular anyway:
Do you want to know how its default contact form looks like?
Like this:
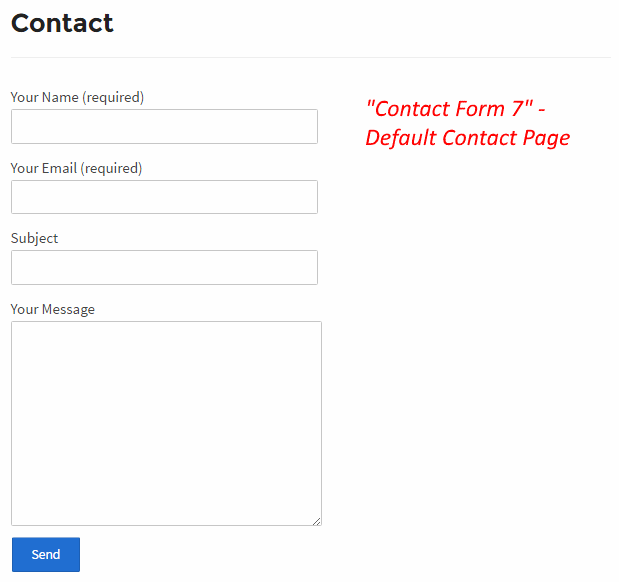
The good news is that Contact Form 7 offers you plug-n-play default contact form:
- Just install the plugin
- A default contact form is prepared for you. Minor (or no) changes needed.
- Create a new Contact page. Copy and paste the HTML code (an easy part) from the form to the newly created page.
- Publish the page.
- Add CAPTCHA if you want.
That’s the whole process. And that’s what I am going to show you now (step-by-step)
READ ALSO: Blank Web Page Template in WordPress – How to Make It?
So here we go:
1. How to Install a Contact Form Plugin in WordPress
Log in to your WordPress Dashboard and navigate to Plugins → Add New. Then search for “Contact Form 7.”
Hit “Install Now” and then “Activate.”
That’s it. The plugin is now up and running.
Next stop:
2. How to Use Contact Form 7 WordPress
After installing and activating the plugin, you should see a new section (Contact) in the WordPress left-hand side menu:
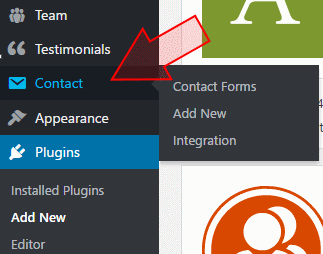
Step 1:
The ‘Contact’ section will expand, providing you additional options. Click on ‘Contact Forms.’ You will find a default contact form (‘Contact form 1’) and its shortcode – all prepared for you:

This shortcode is a piece of code that you later need to copy and paste into your Contact page.
Note! If you need a helping hand while customizing your form (by adding tags, etc.) here you will also find all the links to helpful examples and tutorials:

Step 2: Customizing Your Form
Now, however, open the default form by clicking on its name. That’s what you will see under the ‘Form’ tab:
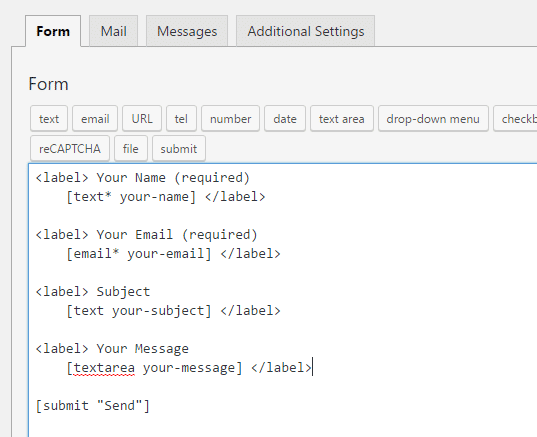
Here you understand why a basic knowledge of WordPress administration is required. However, at this point, everything you need is already here. At this stage, you don’t need to change anything.
Step 3: Checking the Mail Settings
Next, navigate to the “Mail” tab. That too is pre-filled for you. Nothing to change here, except when you want visitors’ emails to land on a different email address:
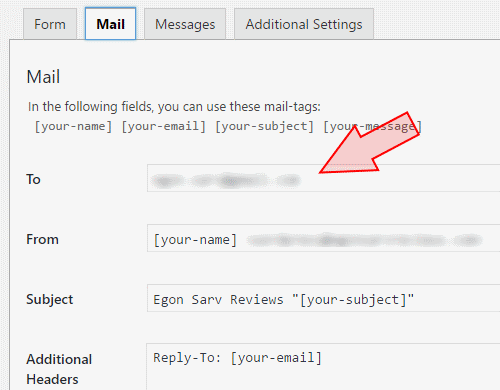
The trick is: When customers fill the form and send it to you, this plugin will send it by email to the very email address that you provide here.
Step 4: Messages
The next tab ‘Messages’ is also pre-populated for you. Scroll quickly through the list and see if you feel happy with the messages. If not, make your changes.
Step 5: Additional Settings
The final tab, ‘Additional Settings’ is for those who feel comfortable with coding and want to make more significant changes to their forms. You can skip it.
Step 6: Saving Changes
After you have finished with the changes, click on the ‘Save’ button.
Step 7: Copy the Shortcode of Your Contact Form
Next, scroll up to the very top of the page. Here you will find the shortcode of your form:

Or navigate back to Contact → Contact Form where there is also the same shortcode.
Copy the shortcode (Ctrl-V). (Note! Select and copy all, including [ and ].)
Step 8: Create a Contact Page in WordPress
Now you can leave from the Contact Form 7 plugin page. Go and create a new WordPress page (not a post). It’s simple, isn’t it? You know how to do it (Pages → Add new).
Name the new page ‘Contact’ or whatever you like your contact page to be.
Step 9: Paste the Shortcode into Your Contact Page:
Now paste the previously copied shortcode into your Contact page:
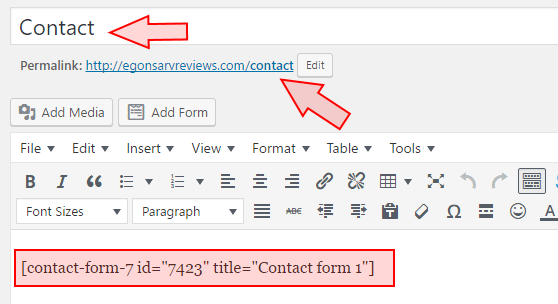
That’s all you need to write on the contact page.
Next, publish the page. Then see how it looks like in real life.
Step 10: Test Your Contact Form
Send a test message through the newly created contact page and see if you receive the email.
Step 11: Add Your Contact Page to Your Blog’s Main Menu
Work your way into the WordPress’ Menus’ section (Appearance → Menus), then add the Contact page to the main menu of your blog:

That’s it.
3. How to Set Up ReCAPTCHA on Your Contact Form
You don’t like spam, do you? Neither do I.
That’s why you may want to add ReCAPTCHA to your newly created form.
“ReCAPTCHA is a free service from Google that helps protect websites from spam and abuse. A “CAPTCHA” is a test to tell human and bots apart. It is easy for humans to solve, but hard for “bots” and other malicious software to figure out.” (Source: Google Support)
Well…ow to do it?
First, you need to register your site with Google and get two essential snippets (or scripts). Second, you need to include these snippets in the appropriate places. So let’s do it.
Step 1: Register Your Site
Register your website with Google here. After logging in to Google, click on ‘Get ReCAPTCHA.’
Add the domain of your blog (follow the examples):
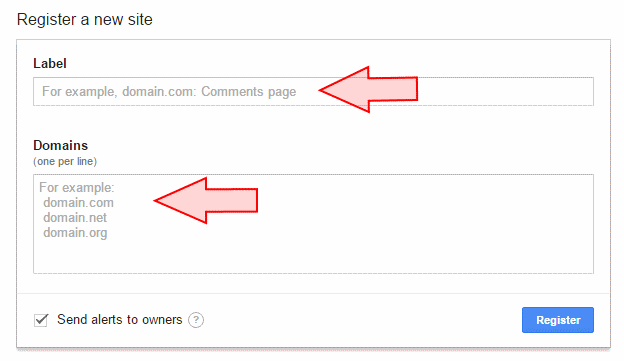
In the Label box, I wrote: egonsarvreviews.com: Contact page
In the Domains box, I wrote: egonsarvreviews.com
Click on ‘Register.’
Now you should see the API keys and the scripts that you need (in fact, the scripts are all you need here):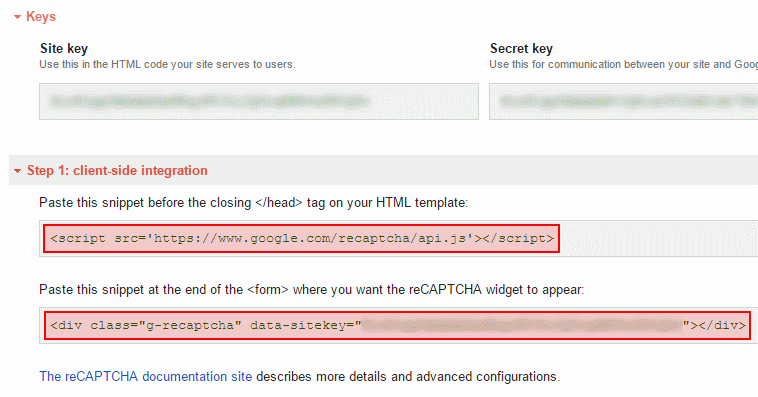
Step 2: Copy and Paste the First Script Into Your Header.php
Under the red headline (see the image above): “Step 1: Client-side integration,” copy (Ctrl-V) the first of the two snippets (or scripts).
Then open your Header.php file (In WordPress, navigate to Appearance → Editor, then from the right-side list, choose Theme Header (header.php).
Paste this snippet before the closing </head> tag on your HTML template:
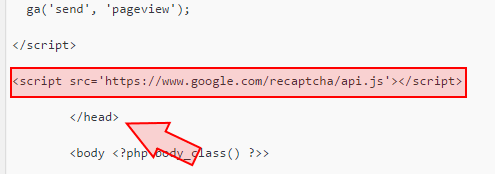
Click on ‘Update file.’
Now your website is ready ta accept the Google ReCaptcha service.
Step 3: Add the Second Script (ReCAPTCHA Snippet) to Your Contact Form
For this, copy the second snippet from the Google ReCAPTCHA page (see Step 1).
Go and open again your newly created Contact Form (Contact → Contact Forms, then open Contact form 1.
Paste the snippet before the [submit “Send”] tag:
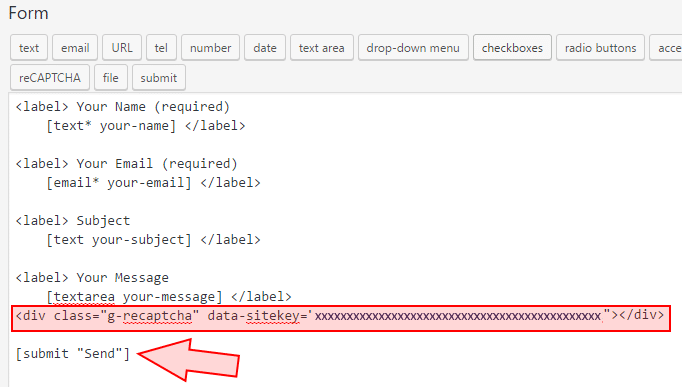
Click on ‘Save.’
Step 4: Test Your Contact Page with ReCAPTCHA.
It should look like this:
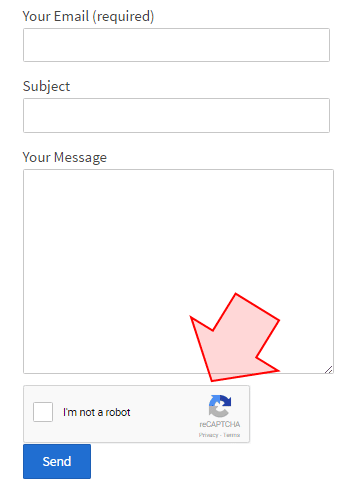
Does it work? Great!
If not, check if you did everything right. There must be some mistake.
Imagine for looking for legit work-from-home opportunities and finding THIS when you go inside… WOW
Yes, the raw, sizzling beauty of passive income stream online… Look closer now. Because sometimes ‘later’ becomes ‘never .‘
What About You?
OK. That’s it. Short and sweet. How did it do? You tell me. Leave me a comment in the comment section below. Thank you :)
If you liked this tutorial, you might also like these:


 ARE YOU looking for ways to create a legit passive income online?
Hello,
I have started blogging myself. I am trying to find out the basic problems that my blog is having and looking for solutions. Also, I’m searching for some basic things like themes and other stuff.
I have read your whole article, I am looking forward to getting a positive result after performing this myself.
Can you suggest me any basic idea that I might need in the future as a new blogger?
Thank you
Hey, Jamie, and thank you for the feedback.
Now… My face is burning with embarrassment because of that 1 month late reply. I am sorry. I was away in August and thus could not answer your comment. Anyway, now I am back and ready to clean up my mess.
So therefore, here are my answers:
1. What are the basic problems that you blog has? Could you figure out.
2. If you are looking for good WordPress themes, why not try WPZoom themes? Yes, I use their Diamond theme for my blog. Check out, maybe you find something for your blog as well.
3. What do you mean with the “getting a positive result after performing this myself?” Can you explain it a little bit, please?
4. I suggest to join Wealthy Affiliate as a Free Starter member, then start their free “Getting Started Certification Course. The course is awesome and will help you get the basic idea on how to become a successful blogger (and to max out your ability to bring in moolah…)
So just “dive in” and take action. You’re in for a treat.
If you have any other questions, just let me know, okay?
Cheers,
Egon