Here’s a true story about Hillary Clinton.
No, no, no! I am not her supporter (this site is not about politics anyway). All I want to do by describing this is to make my point of WordPress 404 Error pages.
Here’s something you can do, at home and at your own pace, to make $1200+ a month online.
Finding out more costs nothing. And you’re not committing to anything else.
On April 8, 2016, Hillary Clinton encountered an embarrassing situation when she failed to swipe through a New York subway turnstile in one go (or even two). In fact, it took her five goes to make the gate open:
Hillary took 5 swipes to get through a New York subway turnstile. Maybe she should’ve used one of Bernie’s tokens. https://t.co/Bn7G9QUkFU
— Sadiq Samani (@sadiqsamani) April 8, 2016
As you might guess, she got mercilessly mocked for her embarrassing failure.
But you know what?
Instead of hiding her face for shame, Mrs. Clinton decided to create a new HillaryClinton Error 404 page:

See! She makes even her Error 404 page to grow her tribe!
How?
By exploiting her embarrassing situation and using a simple Call-to-Action (‘signing up to volunteer’).
It’s brilliant, isn’t it?
Which brings me to the nuts and bolts of the matter —
Why Create a Custom WordPress Error 404 Pages?
[Sidebar: If you want to learn about my #1 work-at-home opportunity, check out THIS! You’re going to like this (Yes, I am using it since 2013).]
Let’s face it:
When your visitors hit “Error 404 – Page not found,” they get confused, don’t they? So, in your opinion, what do they do in that confusion?
Let’s be clear from the start – most probably, they just click away.
And you…?
You are left with the distressing fact that you just lost another hard-fought visitor.
A great way to lose potential customers.
To avoid this embarrassment (this time yours), the custom 404 Error page lets you provide a soft landing to your visitors.
How?
You give them a super-duper user-friendly web page that keeps visitors on your site and helps them find what they’re looking for.
One more thing, though, before I dive into details:
How to See My Error 404 Page?
Do you know how your Error 404 Page looks like?
In fact, it’s amazingly easy. Open your website, then type the URL that you know does NOT exist. Now your WordPress default Error 404 page should load up.
Here’s another SEO tip: What to Include in Footer – Optimize Your Website Footer for SEO and Sales
Let me give you two examples.
Error 404 Page Examples #1:
Let me take Jeff Bullas’ blog http://www.jeffbullas.com/
Let me add to its domain name a path (‘egon’) that I know he does not have: http://www.jeffbullas.com/egon
And voila! Here his 404 page is:

Error 404 Page Examples #2:
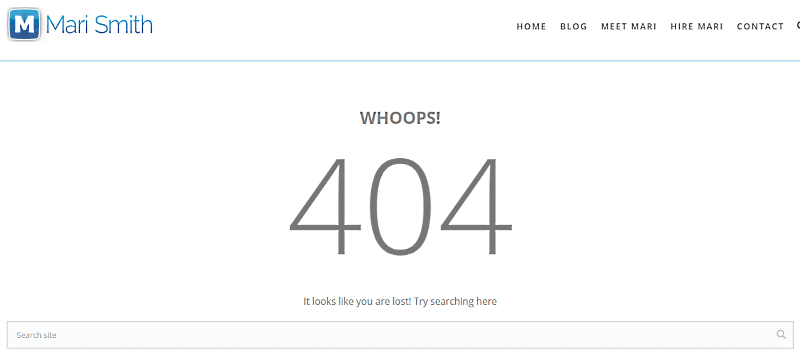
Let me take Mari Smith blog http://www.marismith.com/mari-smith-blog/ and let’s add to it a non-existent path ‘egon’:
http://www.marismith.com/mari-smith-blog/egon
And here you see her Error 404 page:
See! It’s easy. You can do the same with every single website.
Here you find 60 more excellent WordPress 404 error pages.
Now try it with your blog. See what kind of Error 404 page shows up.
What if I could show you a real system you can use to put $1,200+ per month into your account, working from the comfort of your home…
…Would you be interested?
Don’t wait the right moment to start a business. It never arrives. Start whenever. Now.
The page that uploads is probably your WordPress default 404 Template.
Which takes us into another chapter:
2 Ways to Customize WordPress 404 Error Pages
I am going to show you just two simple ways. One way is to customize your WordPress Error 404 template (404.php file).
The second way is to create and set up a brand new custom Error 404 page.
1. Customize the WordPress 404 Template
This method has its pros and cons. The positive side is that you don’t need to deal with the .htaccess file (more about it later) or create a new WordPress Error 404 page. All you need to do is modify the 404 template, which is already up and running.
The downside here is that you need to deal with HTML and CSS code a little bit. I try to help you as much as I can, but if you don’t feel comfortable with it, well, maybe you want to consider the second option instead.
Step 1.
After logging in to your WordPress Dashboard, navigate to Appearance → Editor. It will open your site’s Stylesheet (sheet.php) in the text editor.
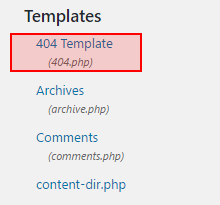
On the right-hand side, you will see the list of all Templates (.php files). Find the 404 Template (404.php file). It should be the very first in the list:
Click on it.
Step 2.
In the text editor, you will see the WordPress 404 template. This is the code you want to customize.
How?
I’m going to offer you a very basic fix because I don’t want to go deep into CSS coding here.
Step 3: Modifying / Removing a Headline

Now, the question is – Do you want to keep the headline, change it, or remove it?
If you are happy with your headline, just leave it. However, if you want to modify it or delete it, do this:
Find the following line in the 404 Template (it starts and ends with <h1> headline tags):
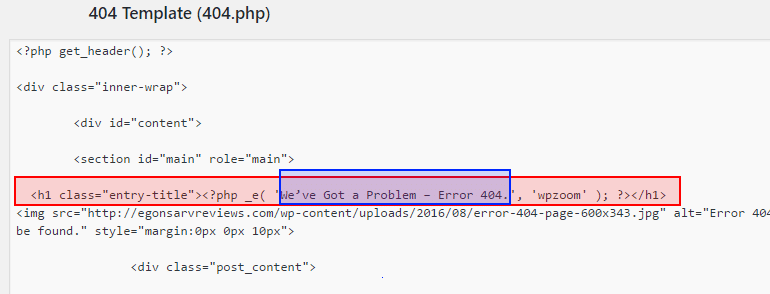
- To modify the headline of the Error 404 Page, just change the text (in the blue box above).
- To remove the headline, delete the whole line (everything in the red box above).
Read also: 57 Tips Writing Good Headlines – Double Your Click-Throughs.
Now, why should you want to remove the headline?
The headline takes some valuable space, and if you plan to use images, some more text, links, etc., it might force visitors to scroll. To avoid the need for scrolling, I decided to remove the headline and use an image instead.
Step 4: Adding an Image
Do you want to add a picture to your WordPress 404 Error page? Then copy and paste the following line into your 404 Template (right after the headline):
<img src="https://egonsarvreviews.com/wp-content/uploads/2016/08/error-404-page-600x343.jpg" alt="Error 404 - the page could not be found." style="margin:0px 0px 10px">

After you have your image uploaded, you need to change its URL here (more about it later).
Now it’s time to prepare your image. Use some image editing software like Photoshop or Paint.net (FREE).
I designed my image like that:

It’s up to you what to write there.
Read Also: Speed Up Your Blog, Choose Appropriate Web Image Sizes
Well, have you finished with your image?
Great. Now it’s time to upload it to your WordPress Media (WordPress Dashboard → Media → Add New).
Remember, you needed to change the image URL?
To get the right URL, click on the uploaded image (Edit Media). On the right-hand side, you see the Save drop-down menu.
Haa! Here it is – the URL of your image:
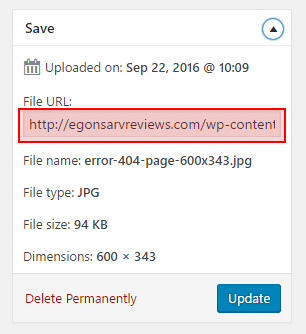
Grab the URL (Copy or Ctrl-C) and pop it (Paste or Ctrl-V) into the 404 Template (a red line in the picture below):

You may also want to change its alt-tag (the blue line). Just type something else in that place.
Step 5: Adding Helpful Links
Remember, Error 404 Page is to keep visitors on your site and redirect them to their destination. Therefore, you may want to add some useful links to the 404 Template.
In my case, I added a link to my blog’s sitemap and homepage. The search box was already there.
So, the lower part of my customized Error 404 template looks like this:
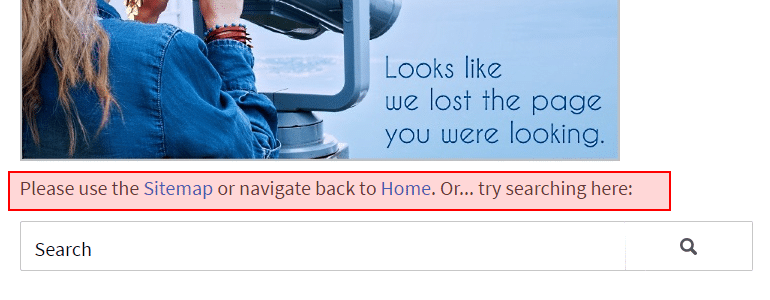
And the code in the WordPress 404 Template is this:

See! There are two links to a sitemap and homepage. Modify the text and links as you like best.
Step 6: Saving Changes
After finishing customizing the WordPress 404 Error page, click on the ‘Update File’ button.
That’s it.
Step 7: Testing the Error 404 Template
Type a URL of your blog that you know does not exist. The modified 404 Template should load up.
2. Set Up Your Own Error 404 Page
If you prefer to use this method, it’s very easy to create your Error 404 page. However, you also need to add another line to your .htaccess file. It’s easy if you know how to do it.
So, here we go:
Step 1: Creating a New Error 404 page
Do it as you do when you create new WordPress page (WordPress Dashboard → Pages → Add New)
Now design your page (put in text, images, links, etc.)
Give it a short permalink. In my case, it is 404page.
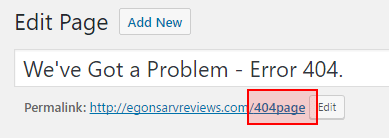
Step 2: Modifying the .htaccess file
At the moment, your custom Error 404 page is just another WordPress page. Nothing special here.
What you need, though, is that when visitors hit Error 404, they are guided to that custom Error 404 page.
How to do that?
Well, by exploiting that .htaccess file.
Therefore, download and open the .htaccess file.
About the .htaccess file, read: Change URL WordPress – 2 Simple Methods You Can Apply Right Now.
Add the following line to the .htaccess file:
ErrorDocument 404 http://www.domain.com/404page.html
In my case, it looks like this:
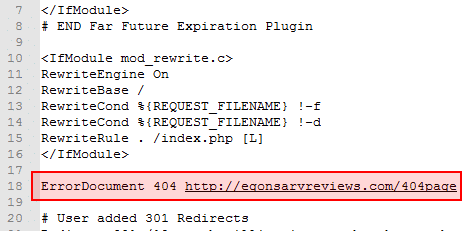
Save the file and upload it.
Step 3. Testing the Custom Error 404 Page
Make sure you type in a non-existent URL of your blog. If you enter the URL of your custom error 404-page, it obviously uploads.
But that is not what you want. You want to see whether the custom Error 404-page uploads when you hit the non-existent URL.
Imagine for looking for legit work-from-home opportunities and finding THIS when you go inside… WOW
Yes, the raw, sizzling beauty of passive income stream online… Look closer now. Because sometimes ‘later’ becomes ‘never .‘
What About You?
Now you know why and how to customize WordPress 404 Error Pages.
What other ways do you know to set up custom 404 Error pages? Please let me know by leaving a comment below.


 ARE YOU looking for ways to create a legit passive income online?
Hey Ergon: Thanks for your very interesting post! I am one of the technologically challenged so I’ve bookmarked your post for later reference. It is certainly lively and very informative and I do appreciate the boatload of information you’ve provided. I will need to study it more, I am thinking.
Dear Netta,
Great to hear you found the tutorial helpful. I always work hard to make my guides as easy to follow as possible (even to a complete novice). So I expect you can do it. And these small details (like an Error 404 page) give your site that extra fragrance, which makes it unique.
And, Netta, thank you for taking time and giving me feedback. I appreciate it. God bless you :)
Nice article. The 404 page is something I haven’t given much thought to until now. You’re so right, you work hard for those visitors, why lose them to something that easy to fix. I will definitely update it and try monetize it. Your step by step explanations are simple to follow. Thanks for the information
Thank you, Andres, for taking your time and give me feedback. I am happy to read your thoughts. And I am happy to hear you found the post helpful.
God bless you, sir :)
Egon
Brilliant! I would definately need to spend more time following your instructions but I like what I see. As a matter of fact, I get a pic whenever I encounter a 404 in one of the companies for which I am an affiliate and I enter something wrong. It is a humorous but embarrasing moment type of page for them letting me know the problem is on their end.
Thank you,
Edward Mijarez
Thank you for your kind words, Edward :) And I am happy to hear you found the tutorial helpful. Obviously, 404 page is not the most important page in one’s site. But it’s still part of it. And often, small details (like how you have handled the embarrassing 404) show how much you care about your customers.
Thank you again for the comment, sir :)