Have you wondered how to add those nice Call to Action buttons to your blog posts and pages?
In my how-to tutorial, “How to Make a Blog Button,” I showed an easy way to make nice buttons for your articles and blog posts. But they were static, not hover buttons.
If you knew how to make $1200 a month online, from the comfort of your home, would you do the work?
…Well THIS is your chance
It’s FREE to get started, too (no credit card required). You’ll like that part…
In this How-to Tutorial, though, I will show you how to use a free website button generator to make cool looking hover buttons. Also, I am going to show you how to insert them into your blog posts and pages.
So let’s dig into the details.
Install a Plugin
The easiest way to make those hover buttons is to use some plugin, which generates hover buttons for you.
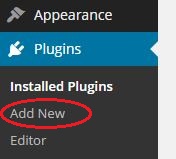
1. log in to your WordPress dashboard and click on Plugins→ Add New.
2. Into the Search plugin field at the top right, type Maxbuttons: WordPress Button Generator, and hit Enter.
3. Once you have found the right plugin, click Install.
4. After the installation is complete, click the blue “Activate” link.
Congratulations: The plugin is installed and activated! You can start using it.
How to Create Hover Buttons?
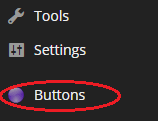
Now I show you how to make Call to Action buttons. Please notice that there is a new Buttons link added to the WordPress main menu. Click on it.
This is the place where you create your Call to Action buttons.
1. Creating the Very First Call to Action Button
If this is your very first button, click on the Add New button.
A. The Basics Section
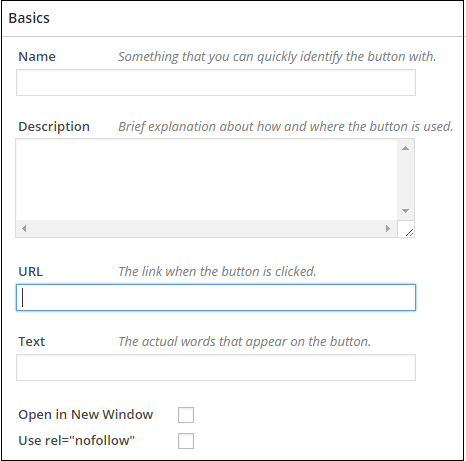
The new window that opens now has quite many options for you. But, in fact, you only need to fill these four fields: Name, Description, URL, and Text.
Here these Name and Description are just descriptive and not really important.
- URL – Type the link to your landing page that you want to be opened when the button is clicked.
- Text – Type the actual words that appear on the button.
- Open in New Window – I recommend to check it too.
B. Colours of a Hover Button
As you have already noticed, the default colors of these hover buttons are green and blue. Green is for the standard button and blue for the hover button. In case you want to change these colors, scroll down to the Colors section, and then pick whatever colors you like.
Gradient Start and Gradient End mean that the top of the button is slightly lighter, and the bottom of it a bit darker. So you may want to change all four colors.
C. Text Attributes
In the Text section, you can change text attributes such as Font, Size, Style, etc. Just play around and find the most suitable parameters for your button.
After you have done with preferences, scroll down and click on the blue Save button.
Now your button is created and added to the Maxbutton buttons list. To see it, click on the Buttons link at the WordPress Main menu.
Here you also see how these attributes – Name and Description are used. The blue title “Download my ebook” is the name of the button. The text “This button takes customers to my landing page” is the description.
Before I show you how to insert the button into your blog post, I show how to create another button similar to this one.
2. Creating a Second Hover Button
As before, click on the Buttons link at the WordPress menu.
After that, you have two options:
a. Create a different button
If you want to create the other button with different characteristics like different colors, text attributes, border attributes, etc. Then just click Add New and build a new button following the instructions above.-
b. Create a similar button to the first one.
1. In this case, select the button you already created and click on the Edit link.
2. In the Add/Edit Button window, click on the Copy button on the menu above.
3. Make your changes (Name, Description, URL, and Text) and then scroll down and click on Save. That’s it. Maxbuttons just created yet another hover button.
Inserting a Call to Action Button Into a Blog Post
If you have installed and activated the Maxbuttons WordPress Button Generator, you also have a new button next to the Add Media button:
1. To add your already created hover button into your article, just put the cursor into the right place in your text. Then hit this Insert This Button.
2. After that, the Maxbuttons plugin inserts a shortcode into your text. It’s something like that:
That’s it. Update your blog post and see. The button is there, waiting to be clicked on it.
Conclusion
There are different ways to make and add Call to Action buttons into your article. This tutorial shows you one easy way to do it. If you follow the steps above, you can easily create cool looking hover buttons and insert them into your blog posts.
Imagine for looking for legit work-from-home opportunities and finding THIS when you go inside… WOW
Yes, the raw, sizzling beauty of passive income stream online. So, click here now. Because sometimes ‘later’ becomes ‘never ‘.
What About You?
What other ways do you use to create hover buttons? Please drop your thoughts in the comment box below.


 ARE YOU looking for ways to create a legit passive income online?
Haha. I woke up down today. You’ve chereed me up!
Really? Glad to hear.
Thank you for sharing and I am happy if I could help. But this is how life is. Sometimes we are down (or at least we feel that way). It’s great if there is something or somebody to cheer us up again. :)