Have you ever wondered why some people have photos or images beside their names when commenting on articles and blog posts while you don’t?
![]()
This little picture next to your name is called an avatar. It is an icon or representation of you in forums, websites, chats, etc. In this post, I will teach you how to make a gravatar. Also, I will show you another great way to use a gravatar.
If you knew how to make $1200 a month online, from the comfort of your home, would you do the work?
…Well THIS is your chance
It’s FREE to get started, too (no credit card required). You’ll like that part…

Avatar vs. Gravatar
Gravatar (Globally Recognized Avatar) is just another type of avatar. It is the most globally recognized avatar and the one that follows you from site to site. On those blogs and sites that support Gravatar, your image will come with you. And it’s FREE!
As Gravatar is connected with your email so if you want to use one, you have to prepare the image (the icon) and then tie it with your email address. In case you have many emails, you may want to decide which images (Gravatars) you wish to use for these addresses. It’s possible to use one image for all addresses or a different image for each address. It’s up to you.
How to Make a Gravatar?
You can use the Gravatar website to make one. Then skip this section. Or, if you want to make one by yourself, follow the steps below.
The actual size of a gravatar image is 80×80 pixels. You may upload an 80×80 pixels image or a bigger one. Again, it’s up to you. If it is bigger than 80×80 pixels, it will be resampled before output. Valid values are from 1 to 512 pixels. Just make sure it is a square size.
1. Open your photo in the Paint.Net image editor. Or use an image editor of your choice, if you want to.
2. Choose the Rectangle Select Tool from the Toolbar.
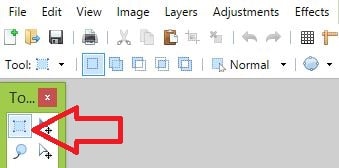
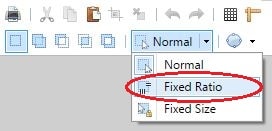
3. From the following drop-down menu, choose Fixed ratio. Then change the values of width and height to be the same (4 and 4, or 3 and 3).
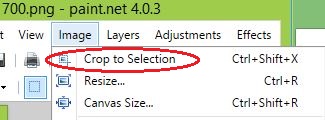
4. Make a square size selection. This will be your gravatar.

5. After that, choose Image → Crop to Selection.
Now you have the image for your gravatar:

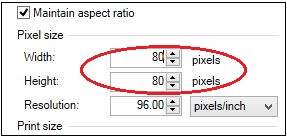
6. To Resize the Image (to make it smaller), choose Image → Resize.
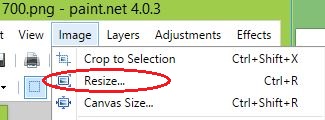
7. Now, you want to give the image width and height of new values. If the Maintain aspect ratio is clicked, it is enough to change only one value. The other one has changed automatically. Then press, OK. The image is resized accordingly.
8. Save your image. PNG and JPG file formats do well.
How to Set Up a Gravatar?
1. On the Gravatar home page, click on the blue Sign in button at the top right.
2. If you already have a WordPress.com account, sign in with your username and password. If you don’t have a WordPress account yet, create one by clicking Need an account.
2. After logging in, you can manage your Gravatars and add new emails.
![]()
3. What exact email you should add here?
Remember that your gravatar is connected with your email address. So make sure you join the image with the right email address. You may want to connect it with your primary email or some other email that is used for blogging.
Have you noticed that usually, the header of a typical comment form is something like this:
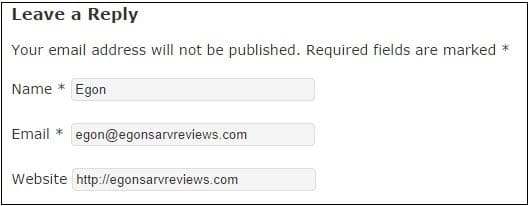
If you are a site owner, you want to advertise your site as much as possible. So you need to connect the gravatar to that email (in my case egon@egonsarvreviews.com)
4. Click the link Add a New Email and type the email that you want to connect with your gravatar. After that, hit the blue Add button.
5. Click the link Add a New Image and upload your gravatar image, which you prepared before.
6. After uploading is finished, select the image to use for the selected email address.
That’s it.
From now on, every time you contribute to forums, chats, etc., your gravatar comes with your comments.
![]()
Onward.
How to Use a Gravatar?
There is another benefit of installing and using an Avatar plugin to your WordPress site. If you are a site owner, you invest your time and energy to publish high-quality content. Then you also wait for feedback from your readers. The more comments your articles get, the better.
The problem is that not all of your readers have set up their Gravatars. Probably most of them have never heard about it. Luckily, you can easily use that place to advertise your site or brand. Now I show you how to do it.
1. Prepare another square size gravatar image that you want to use at places with no user Gravatars. For this, you may want to go through the tutorial about how to design cool photos. Then follow the same steps that I described above, in the section “How to Make a Gravatar Image?“.
To give you an example, I created the following avatar:

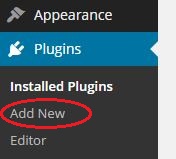
2. After you have prepared your avatar, you need to install a WordPress plugin. There are different options available, but I recommend using the WP User Avatar plugin. To install it, login to your WordPress website and go to “Plugins” → “Add New. “ Type in “WP User Avatar” and click “Search Plugins.”
2. Choose the WP User Avatar and click “Install Now.”
3. After the installation is complete, press “Activate Plugin.”
4. Click Avatars → Settings
![]()
5. For Avatar Display, make sure Show Avatars is selected. For Default Avatar, hit the Choose Image button and upload your newly created avatar. Then select that uploaded avatar.
![]()
6. After that, click Save Changes. That’s it.
7. Now go to your website and refresh it. Then check out if your newly created avatar shows up? In my website comments without a gravatar look like that:
![]()
It’s much nicer, do you agree?
Conclusion
Using a gravatar helps you to advertise yourself and your brand globally. Following the steps above, you can make and set up gravatar to use for your emails. You can also replace default avatars in your website comments with a more meaningful avatar, thus advertising your brand even further.
Imagine for looking for legit work-from-home opportunities and finding THIS when you go inside… WOW
Yes, the raw, sizzling beauty of passive income stream online. So, click here now. Because sometimes ‘later’ becomes ‘never ‘.

What About You?
Do you have questions or comments? Feel Free to drop me a comment below, and I will get back to you.
And if you liked the tutorial, please share using the social buttons.


 ARE YOU looking for ways to create a legit passive income online?
Hmmm, very nicely done. I have seen the gravatar on other forums but I had no idea how some comments had the author’s picture, where as my comments just had the silhouette. Thank you very much for sharing! I will need to dig further into exactly how to use this for my website, to make it unique plus my own brand.
The good thing is, once you set your gravatar(s) up, you don’t need to bother about them any more. They just show up every time and everywhere you comment or interact online. I tried to write my tutorial the way that it would be easy to follow and accomplish it. In case you decide to follow my tutorial, let me know if it was helpful or if you struggled somewhere. Then I can improve my post. But thank you again for your feedback :)