Do you want to make better friends with Google?
If so, the first thing you might want to do is sign up for Google Webmaster Tools (GWT).
Below is a quick and easy guide on 1) How to add your site to Google Webmaster tools; 2) How to enter verification code to your website, and 3) How to add an XML sitemap to Google Webmaster tools.
Before that, though, let me quickly outline what Google Webmaster Tools is and how it is useful.
Imagine for looking for legit work-from-home opportunities and finding THIS when you go inside… WOW
It won’t cost you a bean. And you’re certainly not committed to anything.
What is the Google Webmaster Tools (AKA Google Search Console)?
Google Webmaster Tools (now known as Google Search Console) is Google’s official toolbox to give site owners an extra set of tools, additional to what they already get in Google Analytics.
GWT is beneficial primarily because it allows you to see how Google views your site. For example, it helps you see which keywords get high search volume and which ones get high click-through rate (CTR).
Let me quickly list some of the other benefits you will get there:
- GWT reports do help you understand how different blog posts and pages on your site appear in Google search results.
- It allows you submit XML sitemap of your website (see below)
- It will enable you to exclude URLs
- It helps Google display the most essential content of your site
- Shows links to your site (who links the most, your most linked content, and how your data is linked)
- Site performance
- Subscriber stats
- Fetch as Google
- Crawl errors
- Diagnostics
- etc., etc.
In other words, Google Webmaster Tools is a toolset that allows you to understand what’s going on with your website. It will enable you to make intelligent decisions that are based on data instead of taking random shots.
How to Set Up Google Webmaster Tools
Let me show you now how to add your website to Google Webmaster tools.
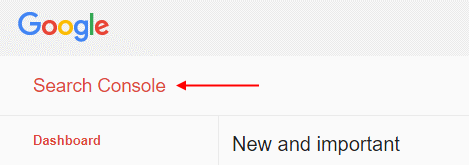
Step 1. Log in to the Google webmaster tools dashboard. Once there, click on Search Console:
After that, you should see the red “Add a Property” button on the upper right corner of the window:
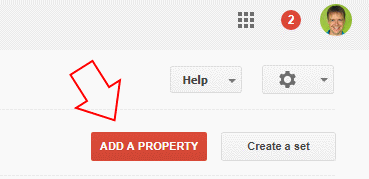
As a result, a small popup window will be opened.
Step 2: Enter the URL of the website that you want to add to Google Search Console. Then hit “Add.”
Your website is now added to Google Webmaster Tools, and the only thing you need to do is verify it. Here’s how to do it:
How to Enter a Verification Code – 3 Different Methods
There are different ways to verify your website on Google Search Console. I am going to cover the 3 easiest ones and see which one you like best.
According to Google, though, their recommended method is HTML file Upload. Let’s see how to use that.
Method #1: How to Upload the HTML Verification File
After you hit the “Add” button (see Step 2 above) then on the next screen you will be asked to verify your website (=verify your ownership):
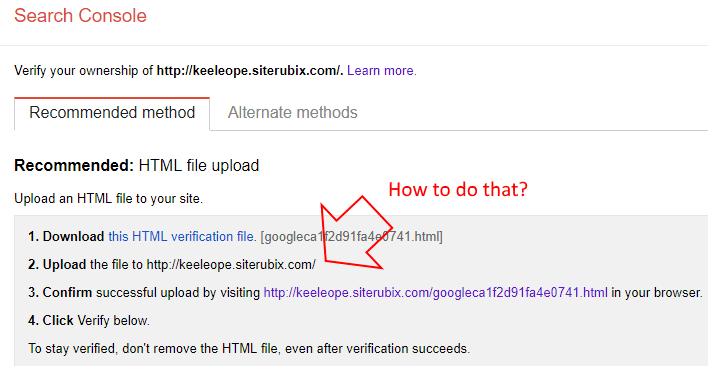
As you can see from the image above, I use keeleope.siterubix.com as an example. This is my website, and I want to verify my ownership.
The whole process is pretty simple, isn’t it? Well, the big trouble here is that there’s no instruction on how to upload the file (point 2).
So here’s how to do that:
After downloading the HTML verification file, use some FTP client to upload the file to your website’s root directory (Here’s my detailed guide on how to use a free FTP client and transfer files with FileZilla):
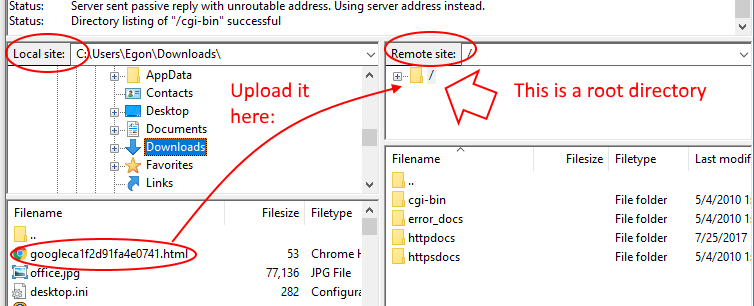
After that, you can click Verify below. Now you should see the message that you have successfully verified your ownership of your website.
Method #2: Use an HTML Tag
In this case, you need to add a meta tag to your site’s home page.
First, select and copy the meta tag:

As a second step, log in to your WordPress website. On the left-hand side menu, click on Appearance → Editor. Now you will see a list of templates on the right. Scroll down until you find Theme header (header.php). Click on it.
Next, find the closing </head> tag and paste the previously copied meta tag right before that:

After that, save the header.php and go back to the Google Webmaster tools website, then verify your site.
Method #3: Enter the Verification Code In WordPress SEO Plugin
If you are using the All-in-One SEO Pack WordPress plugin, you can copy and paste the verification key in the plugin.
Here’s how to do it:
First, copy the verification key from the meta tag:

Second, in your website dashboard, open General Settings of the All-in-One SEO Pack and scroll down until you find the Webmaster Verification section. Paste your verification key there:

Save settings, then go back to the webmaster tools website and verify your site.
Add Your XML Sitemap
The very next thing you would want to do (after the verification process is completed), is to add your XML sitemap.
Here’s how to do it (one of the easiest options):
Step 1: In your website dashboard, navigate to the Plugins section. Click on Add New, then search for “Google XML Sitemaps.” Install the plugin, then activate it.
Step 2: At the left-hand side menu, navigate to Settings → SML-sitemaps. On that screen, you will see that the sitemap.xml file is already created:
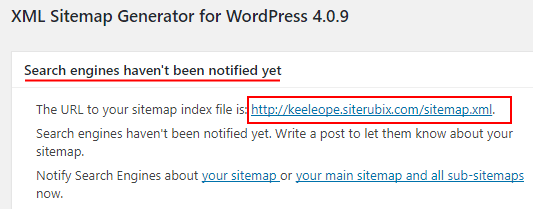
However, search engines haven’t been notified yet. That’s why you need to add your sitemap.xml file to Webmaster tools.
Here’s how you can do it:
Step 1: Head back to Google Search Console, then click on your property (your newly added website).
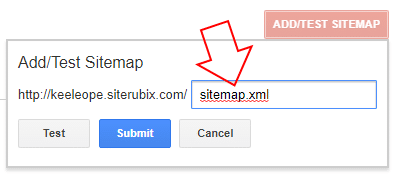
Step 2: On the left-hand side menu, navigate to Crawl → Sitemaps. It says, “No sitemaps found for this site.” On the top right corner, you see the red button “Add/test sitemap.” Click on it:

Step 3: Type sitemap.xml into the text field, then hit Submit:
What About You?
Google Webmaster Tool is a great and free tool that will help you a lot. If you have not used it yet, you can start right now. It’s free, and it will help you understand what to do to improve your Google traffic
Finally, what do you think about GWT? Please leave me a comment below.
Imagine for looking for legit work-from-home opportunities and finding THIS when you go inside… WOW
Why not do it now, and let’s see if it can help you? Just click on the button above.



 ARE YOU looking for ways to create a legit passive income online?
Thanks for writing such a good article on Google Webmaster tool. I am looking to try these techniques for my website. Your tips are helpful for the person to make good blog marketing for their websites or blog. This content is so valuable and surely unique that people are happy and really helpful for them. there is no any other ways to get customers than Google indexing and Marketing and no any pressure from your side. Neither in the form of request nor hint or reminder in any ways.
Thanks
Hey, Birchi, and thank you for the comment. Also, thank you for the kind words. I am glad to hear you found the article helpful.
God bless you,
Egon
What a helpful and important post – thank you for publishing it. I have bookmarked it and your excellent site. What you made me realize is that I had posts indexed under the old HTTP without the S and that I needed to have all versions of my site indexed, so thank you.
Hi, Doug, and thank you for the comment and kind words. I am glad to hear you found the article helpful.
Truth be told, Google Webmaster Tools rebranded to Google Search Console. Other than that, the tutorial here is still correct.
Cheers,
Egon