Trying to find ways to change URL WordPress? In this post, I give you not one but TWO insanely simple methods.
There are times when you desperately need to change the permalink or URL of your blog post or page.
- Maybe you have to delete or post at some point.
- Or, your permalink is looooooooooong and ugly.
- Or, your target keyword is at the end of the permalink.
- Or you want to improve your site’s SEO.
If you knew how to make $1200 a month online, from the comfort of your home, would you do the work?
…Well THIS is your chance
It’s FREE to get started, too (no credit card required). You’ll like that part…
Did you know that Google checks only the first three words of your permalink’s file path? Therefore, regarding SEO, everything after five words is meaningless. That’s another reason why you may want to improve your permalinks.
So, the question is how to do it? Let’s dig right into the details.
Redirect 301
According to Moz, “Redirection is the process of forwarding one URL to a different URL.”
That’s what you want, right?
So, say, you have the current URL: http://mysite.com/old-filepath
and you want to send all its traffic to the new URL: http://mysite.com/new-filepath
So how do you do it?
By using redirects.
Truth be told, there are three different types of redirects:
- Redirect 301 – “Moved permanently,”
- Redirect 302 – “Found” or “Moved Temporarily,” and
- Meta Refresh – using the meta tag “Refresh.”
In your case (the example above), please use the first one in the list – “Redirect 301“. This is a permanent redirect, and in most cases, it is the best way to apply redirects on a website. Also, according to Moz’s article mentioned above, Redirect 301 “passes between 90-99% of link juice (ranking power) to the redirected page.”
This is good.
READ ALSO: How to Make Google Crawl Your Site Faster? The Secret of Fetch as Google
2 Simple Methods to Change URL WordPress.
In this post, I show you two insanely simple ways to redirect your permalinks in WordPress. Even better, you can apply them right now. So, what are they?
- Using a proper WordPress plugin
- Changing the .htaccess file
The first method requires a proper plugin. So let’s start with the plugins.
The Top WordPress Plugins To Change Permalinks
There are quite a few WordPress plugins on the market (both free and paid) to change the URL in WordPress. However, here I am going to give you just a list of some of the options. I am not going to dive into details of how to use these plugins (except my #1 preference).
Here we go – the top plugins to change URL in WordPress:
- Redirection (Free) – my #1 recommendation
- Simple 301 Redirects (Free)
- Quick Page/Post Redirect Plugin (Free)
- Safe Redirect Manager (Free)
- Redirect (Free)
- Yoast SEO Premium ($69 per year)
These are the top WordPress plugins to change permalinks. Now, I show you how to change the URL in WordPress by using the Redirection plugin.
Method #1 – Use Redirection WordPress Plugin
Using the Redirection plugin is the easiest way to go.
However, there come two negative side-effects with the method:
- Your site has an additional plugin to handle. Plugins tend to burden websites and make them slower. So it is wise to keep the number of plugins as low as possible.
- The Redirection makes these particular pages slower to open. That is not good either.
Other than these two things, the method is efficient and straightforward.
First, you have to install the Redirection plugin (I come to this soon). After that, the method can be divided into two simple steps:
- You have to change the actual permalink (URL) of your WordPress post.
- Using the plugin, you redirect the old permalink to the new one.
That’s it. Now, let’s dig into the details.
First, you want to install the plugin. I recommend using the Redirection plugin to change the URL in WordPress. By the way, this is the most popular WordPress plugin to manage 301 redirections and keep track of 404 errors. And best of all – it is 100% free.
1. Install the Redirection WordPress Plugin
If you don’t know how to add plugins in WordPress, here are the simple steps:
1. Log in to your WordPress website. Then, go to
Plugins → Add New → Search Plugins.
2. Into the search box, type Redirection, and hit “Search.” After finding it, install the plugin and then activate it.
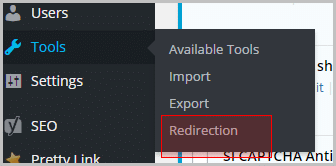
3. Now in the menu on the left-hand side (in the WordPress dashboard), you should see “Redirections” under “Tools” settings:

Do you see it? Click on it.
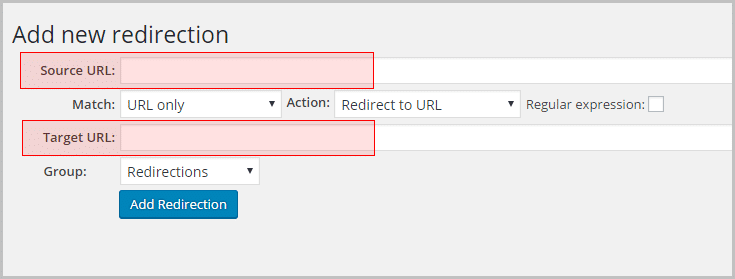
The Redirection plugin will open, and you see the “Add new redirection” section:

This is the place where you enter your old and new permalinks (URLs). But, you have to change your post’s permalink in the first place. So, let’s do this first.
What if I could show you a real system you can use to put $1,200+ per month into your account, working from the comfort of your home…
…Would you be interested?
Don’t wait the right moment to start a business. It never arrives. Start whenever. Now.
2. How Can I Change My URL on WordPress
1. Open your page in a new browser window. Then copy and paste its URL into the Source URL box in the Redirection plugin (shown in the image above):
2. Open your post in a WordPress admin area.
3. Under the Page Title, you see the permalink:

4. Hit the “Edit” button and give your post a new permalink.
5. Hit the “OK” button. After that, update the post.
That’s it. Your post has a new URL now. Please test whether your post or page opens in a browser with the new permalink. If it does, great. If it does not, edit the URL again and check if something went wrong.
Well, now you can start redirecting the permalink.
3. Redirect URL Using the Redirection Plugin
1. Copy and paste the new permalink into a Target URL box in the Redirection plugin window.
2. Click on the “Add Redirection” button.
That’s it. The Redirection is created.
Please test if it works. Remember, your post has a new permalink, and if the Redirection fails, all the present links to the old permalink are going to get the Error 404: “Page not found.”
To test if it works, paste the old URL into a new browser window and see if the post opens with the NEW permalink.
Method #2 – Redirect 301 Htaccess
As you remember, two negative side-effects were accompanying the Redirection plugin usage – (1) additional plugin and (2) slower opening times for posts with redirections.
Because of this, there is even better yet as a simple method that you can use. And it is even more efficient.
What method is it?
You write the redirections right into the .htaccess file.
Hey! Into a what file?
Relax. Don’t be scared. I explain.
According to Wikipedia, the .htaccess (hypertext access) file is a directory-level configuration file supported by several web servers, used for configuration of site-access issues, such as URL redirection, URL shortening, Access-security control (for different webpages and files), and more.”
Confusing?
Maybe. The good thing is, you don’t need to understand it. Really!
There is very little that you need to know or do: First, how to open the file. And second, you need to write a few short lines of text into it. That’s it.
First things first –
1. Where’s My Htaccess File?
The .htaccess file sits right in the Webroot folder of your website. There are different ways to get access to it.
One way is to use some free FTP client like FileZilla. With this, you can work your way into the root directory. Here I explain, how to do it (See “FTP Client Software” section).
However, the dot in .htaccess makes it a hidden file. So, you have to make sure your FTP client shows hidden files.
In FileZilla, select Server from the menu and then check “Force to show hidden files.”
But, unfortunately, in my case, it did not help. Even then, the .Htaccess did not show up. What could I do? Well, I was looking for other options.
And you know what?
I found an even more simple way to open and modify the .htaccess file.
2. Open the Htaccess File by Using a Plugin.
Yes, a plugin. However, this time, the plugin is different has a different impact.
How?
Simple. It is temporary. You only need the plugin to modify the .htaccess file. After that, deactivate and delete the plugin. It will not burden your website.
1. As before, navigate to the Plugins page in WordPress. Then find, install, and activate the WP Htaccess Editor. This is the name of the plugin.
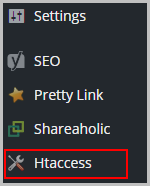
2. After installing and activating it, you should see the Htaccess link on the left-hand menu.

Do you see it? Click on it.
3. Voila! Faster than the snow melts before the summer sun, the plugin opens the .htaccess file for modifying.
Could you open it? Great!
3. Making Backup of .htaccess File
- Select ALL the code in the Content of the Htaccess file window (you can do it by clicking on the code once and then pressing Ctrl-A).
- Copy (Ctrl-C) and paste (Ctrl-V) the code into a Notepad and save it to your computer. Do NOT use MS Word or similar for this.
This way, you have an additional backup copy. Just in case you mess something up and need an original code to restore it.
4. Make 301 Redirects in Htaccess File
Fortunately, it is insanely simple.
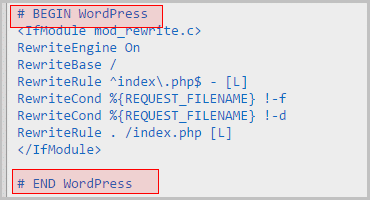
1. Scroll through the code and find this place in the code:

2. Before that section, right before the first line in red, “#BEGIN WordPress,” you want to write these two lines of text (follow it strictly):
# User added 301 Redirects
# END User added 301 Redirects
Now, between these two lines (# User added… and # END User…), you are going to write all the redirections that you want to create.
How do you do it?
3. The format of 301 Redirects in an Htaccess File is like this:
Redirect 301 /old-file-path http://yoursite.com/new-file-path
Do You want an example? Good. Try this one. This is from my site:
# User added 301 Redirects
Redirect 301 /how-to-3 https://egonsarvreviews.com/how-to
Redirect 301 /helpful-sites https://egonsarvreviews.com/honest-way-to-make-money-online
# END User added 301 Redirects
Please note, the Source URL has only the last part of the old permalink while the new permalink is included entirely.
This way, you can add as many 301 redirects into the Htaccess as you like. Just make sure you follow the exact format, or it is going to fail to redirect.
It is easy, isn’t it?
4. Click on the “Save File” button.
That’s it. Now, test it. Copy and paste the old URL into a new browser tab and see if it redirects it to the new address.
Notice, the Redirection is fast. Very fast.
Conclusion
There are different reasons why you may want to redirect your permalinks. This post here gives you two simple methods to do that. They are a bit different in character so find out which one suits you best.
But remember, just deleting an unnecessary post or page with its URL will cause a 404 not found error. The same will happen when you rewrite your permalink. Redirecting your old permalinks to the new addresses will help you avoid those annoying 404 errors.
Imagine for looking for legit work-from-home opportunities and finding THIS when you go inside… WOW
Yes, the raw, sizzling beauty of passive income stream online… Look closer now. Because sometimes ‘later’ becomes ‘never .‘
Share Your Ideas:
Your feedback is important to me. Therefore, may I ask you to drop me a comment and tell me if the article was helpful? Did it help you redirect the URL-s? Or is there something still confusing? Please let me know in the comment box below.
You may also like:
- How Do I Set Up Google Analytics, An Important Tool For a Traffic Growth?
- How Do I Stop Google Analytics From Tracking Internal Traffic?
- How to Make Google Crawl Your Site Faster? The Secret of Fetch as Google
- How to Find Keywords Using the Best Long Tail Keyword Research Tool


 ARE YOU looking for ways to create a legit passive income online?
I never knew that Google just checks or looks at the first three words of the perms link address. I don’t want add another plugin as I don’t want the speed of my site to suffer. The last method you show, can you do that for maybe the middle of the permalink?
Hi Owain,
I learned about short URLs from Brian Dean (Backlincko). His site gets 150,000 uniques per month with only 33 blog posts he is clearly an SEO expert. I could not find the exact place where he said it. However, he learned it from the official Google sources (that Google does not check url after 5th word or so).
Anyway, here’s what Brian says: “our analysis of 1 million Google search results revealed that shorter URLs tend to perform slightly better in Google than long URLs.” (source)
At the same time, it is not wise to go and rewrite every single long URL. Rather, use short URLs in the future.
As for the additional plugin, I don’t use that either. As for your last question, can you explain what you mean? I did not get it :(